Question ID: 2000-4654-1-5-7-10
Recipe Description
I did not put these tips in any order and I used most of the tips while making this bread. Store flour and yeast in the freezer and it will keep longer. Allow ingredients to reach room temperature for best results. Purchase farm fresh eggs. Olive oil adds moisture and shelf life to gluten free breads. Make smaller loafs baked at lower temperatures and baked for a longer period of time. Metal pans are best. Make original recipe first then experiment with different ingredients if you like. Adding 1 teaspoon of Psyllium husk powder is kind of like a secret ingredient that binds the dough together and adds fiber! Successful baking has a lot to do with knowing what temperature is best for your altitude. For high altitudes subtract one degree F for every 500 feet above sea level. Generally for higher altitudes use 1/4 less flour but I don't know if that applies to gluten flour because for this recipe I did not reduce the flour and it was fine. Test yeast by adding 1 teaspoon of sugar to liquid and yeast. If it doubles in volume in 10 minutes it is active. Check eggs to see if they are good. Place the eggs in a bowl and cover with water. If the egg is bad it will float to the top. Add extra egg or egg white if bread is too dry or crumbly. Do not over-beat mixture. Expandex adds a wheat-like texture to gluten-free breads. Brown sugar is better to use than white. Don't use a dough hook with gluten free bread. Do not double the recipes. Make two separate batches if you need more loafs. Adding Ascorbic acid will help preserve your bread.
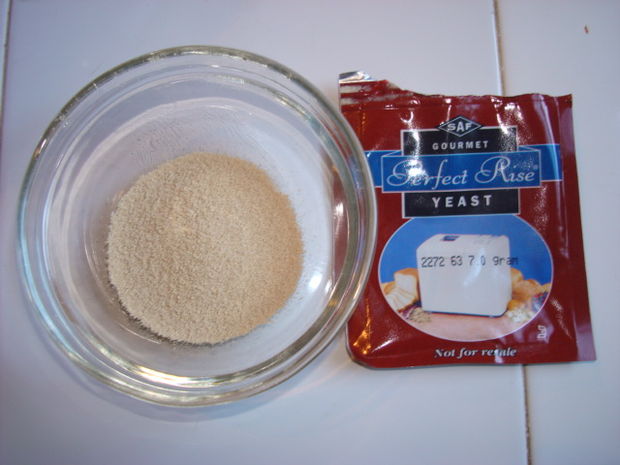
I looked at the recipes I wanted to make and because we are not planning on going on a gluten free diet anytime soon, I opted to purchase Bob's Red Mill Homemade Wonderful Bread Mix that was Gluten, Wheat, and Dairy free as shown. It had a lot of the ingredients that I was looking for. It included yeast and Xanthan Gum. It worked out nicely because it was slightly over 3 cups of flour for my recipe. For anyone who is just now learning about a gluten free diet it would be inexpensive to try and a great way to see if they like the combinations of flours used in the mix and later experiment with different flours. This recipe seems to be pretty forgiving as I made three different batches of breads adding a few different ingredients and all three were perfect. 3 Large eggs slightly beaten ( room temperature) Farm fresh is best for gluten free baking. 1 tsp apple cider vinegar (I used organic) 1/4 Cup Grape-seed oil or Olive oil, 1 1/3 Cup coconut milk (organic) 1 Tablespoon plus 1 teaspoon Agave Nectar 3 Cups gluten free Red Mill bread mix 1 Package yeast included in flour mix or 21/4 teaspoons active yeast 1 Teaspoon psyllium powder For the cranberry and dill breads I used all of the above ingredients and: Cranberry: Craisins and crushed pecans as desired. I divided the recipe into thirds and added about 1/4 - 1/2 cup of each, I did not measure so I am not sure about the 1/2 cup. Dill: I added 1 teaspoon of dill weed 1/4 Cup Greek yogurt 1/8 Cup Flaxseed mealWe enjoyed the Craisin and plain bread the best but all three turned out very good. The Dill and Yogurt were not very noticeable in the recipe so perhaps adding more would have made it better but more Flaxseed meal would need to be added to compensate for the additional Yogurt. This recipe made 8 mini loafs 3 inches X 5 inches and 6 standard size muffins or approximately 1.5 standard size loaf pans.
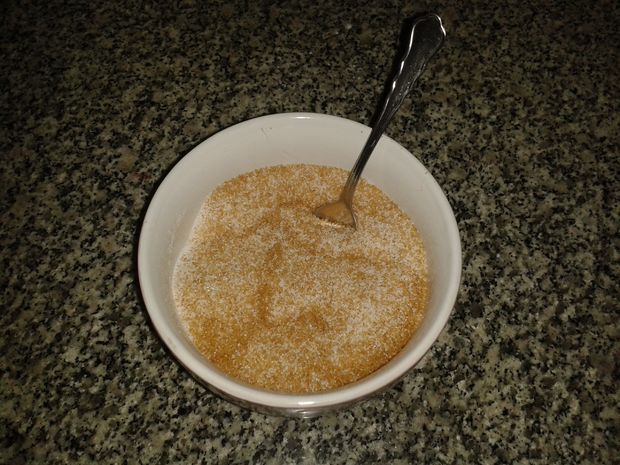
A reminder . . . make sure all of the ingredients are room temperature to achieve the best results. I turned on my oven light ( to add warmth to the oven for the bread to rise ) I have a gas oven. I used 1/4 cup of the coconut milk from the 1 1/3 cups of measured coconut milk to start the yeast. I added the yeast packet included in the flour mix to the milk and stirred it well. To see if your yeast is good add 1 teaspoon of sugar to the milk and yeast mixture and if in 10 minutes if it has raised double in size it is good.
Mix the eggs, vinegar, oil, milk, and Agave Nectar, together on low speed for a couple of minutes using a hand mixer or by hand.
Add the Psyllium Husk Powder to the flour mixture and mix thoroughly. Sift together.
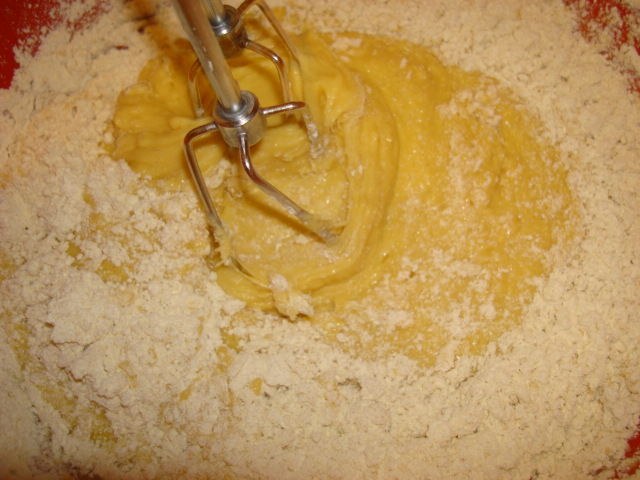
Slowly add the flour mixture to the egg mixture and mix on medium speed until well incorporated. You may need to mix by hand as you add more flour.
Add the yeast mixture to the dough mixture and mix thoroughly.At this point the dough mixture was quite sticky and gooey. I was tempted to add more flour but when I mixed it, the mixture pulled away from the edges of the bowl, so I decided to go ahead with this mixture and see what happens.
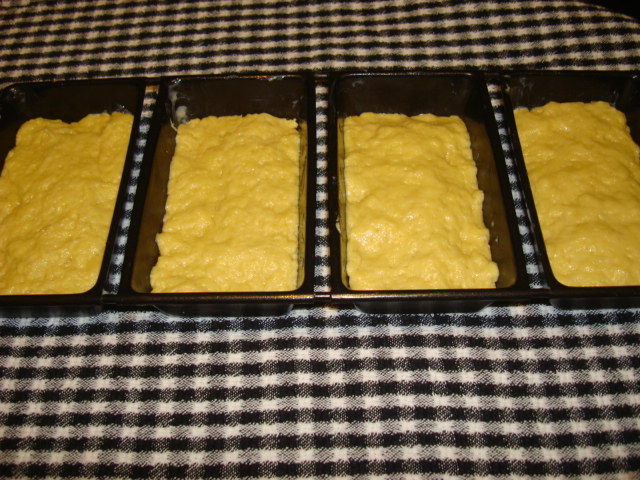
Oil the mini baking loafs. Put butter or oil on your hands to keep the dough from sticking to your fingers. Place enough dough in the pan to fill half way. Form the dough to the pan and gently press. Place pan in the oven to let raise about 45 minutes or until the dough is level with the edge of the pan.It is best not to allow the dough to rise higher than the edge of the pan to prevent the dough from collapsing during baking.
Remove the bread dough from the oven while you pre-heat the oven to 340 degrees or set a temperature best for your altitude. To adjust for higher altitudes refer to my tips step 1. Lower temperatures are recommended for smaller loaf pans and longer baking times.I baked mine at 340 degrees F ( for higher altitudes ) for about 20 - 25 minutes.
When the bread is done turn off the oven and crack the door slightly. I always butter the tops of the bread when it is still hot so the crust is not hard. Keep the bread in the oven for about 5 minutes. Then remove it from the oven and place the pan on top of the stove to cool until you can handle the pan. Remove the bread carefully and place the loaf on a cooling rack. After it has completely cooled, place the bread in an airtight container and store in the refrigerator or freezer. It is best the first day and up to 3 days in the refrigerator. If it last longer than three days, store it in the freezer and thaw when needed.
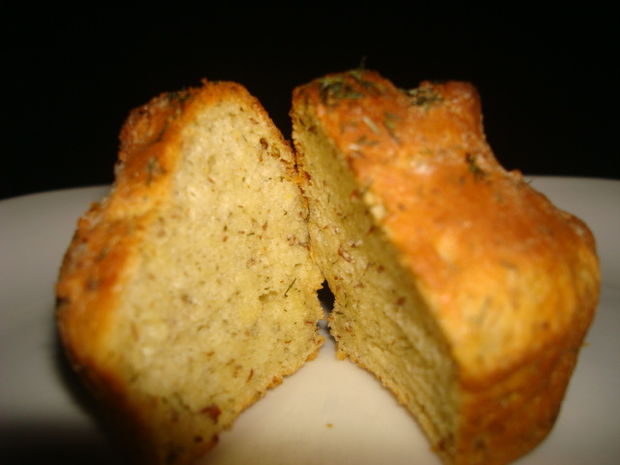
I made the cranberry bread exactly like I did the base recipe but added nuts and Craisins to the mixture after I added the yeast. I made the Dill bread using the same ingredients as the base recipe but added 1/4 cup of Greek yogurt, 1 teaspoon Dill weed and 1/8 cup of Flaxseed meal and baked them in a muffin pan. It took longer for these to bake. I estimate 30 minutes at 340 degrees F.
I was expecting a bread that I would not like when I made this, because of my sister's experience; I was pleasantly surprised it had a great texture and flavor! It tasted like real bread! I was even more surprised when my husband liked it! My next-door neighbors loved the flavor, texture and the fact it did not have a lot of sugar in it. I sent a loaf to my friend who does not like gluten free bread at all and she loved it. I called my brother and he said he really missed home baked bread and was asking me for a bread machine recipe so he could bake some bread. The next day I baked this bread and took him a couple of loafs. The next time I bake this bread I am going to try using Olive oil and I may try adding some coconut flour because it has a nice flavor. Coconut flour has a tendency to draw moisture from the dough so more liquids will be added to compensate for that. I will also try to find a way to smooth out the top so it is more level but still leave the rough look for the visual appearance. I will allow it to raise another ten minutes or so to try and achieve a lighter loaf, even though I liked this version it is fun to experiment. My husband and I each sampled a sliver or two of each loaf of bread I made. He has requested more bread tonight, but I told him we had to wait until I took some good daylight pictures. He said I could make more! I told him that I did not have any more gluten free flour. I suppose I could use regular flour and adjust the recipe accordingly, but we won't tell him that . . . will we? After all I am kind of tuckered from baking bread all day! My brother sent me home with a new bread making tool! After such a hot summer, September was celebrated with a smile! I will be baking more bread very soon! Thank you instructables, our sponsors, authors, and loyal readers for making this an awesome place to share what we make. Have a safe and happy fall! sunshiine
Question & Answer
Question: Choose the best image for the missing blank to correctly complete the recipe.
Choices:
 |
 |
 |
 |
|---|---|---|---|
| (A) | (B) | (C) | (D) |
|
|---|
 |