Question ID: 4000-9624-5-6-7-8
Recipe Description
Before you begin, if you aren't experienced with making chocolate, read my chocolate making tutorial which includes information on types of chocolate to use, melting instructions and the recipe for modeling chocolate.
You'll need:
6 ounces melted and tempered pure dark chocolate or melted confectionery coating/candy melts
6" egg shaped cookie cutter*
baking sheet lined with parchment paper
rubber spatula or spoon
kitchen twine or ribbon
scissors
dark modeling chocolate (recipe here)
rolling pin
cocoa powder for dusting work surface
cutting board
pizza wheel or knife
fine tip paint brush (new or one that is used for food projects only)
pastry brush
penguin decoration template (download here)
white modeling chocolate (1/4 of a recipe - here)
orange food coloring
powdered sugar for dusting work surface
small amount of corn syrup (less than a teaspoon)
candy, nuts, cookies, or chocolate to fill your boxIf making white chocolate snowflakes:
10 ounces melted and tempered white chocolate or melted white confectionery coating/candy melts
snowflake chocolate molds
disposable pastry bag or spoon
*If you don't have a 6" egg cutter, you can use any size you have. Just adjust the size of the penguin decoration template pieces to fit the egg you use.
Set your egg shaped cookie cutter on a baking sheet lined with parchment paper. Pour 2 1/2 ounces of melted and tempered pure chocolate or melted confectionery coating/candy melts into the middle. Use a rubber spatula or spoon to spread the chocolate out into a thin even layer. Gently tap the baking sheet to spread the chocolate out and remove any big air bubbles. Refrigerate if using pure chocolate, freeze if using candy melts until the chocolate is set -about 10 minutes.
Remove the chocolate egg from the cookie cutter by gently pulling the edge of the cutter away from the chocolate. The chocolate egg should fall right out of the cutter.
You will need to repeat the process above to make the second egg. You need one egg shaped base and one egg shaped lid. Be sure to reserve about an ounce of melted chocolate to use as the glue that will hold the pieces of your box together. Once you un-mold your eggs, turn them upside down and use the smooth side of each egg for the base and top of your box.
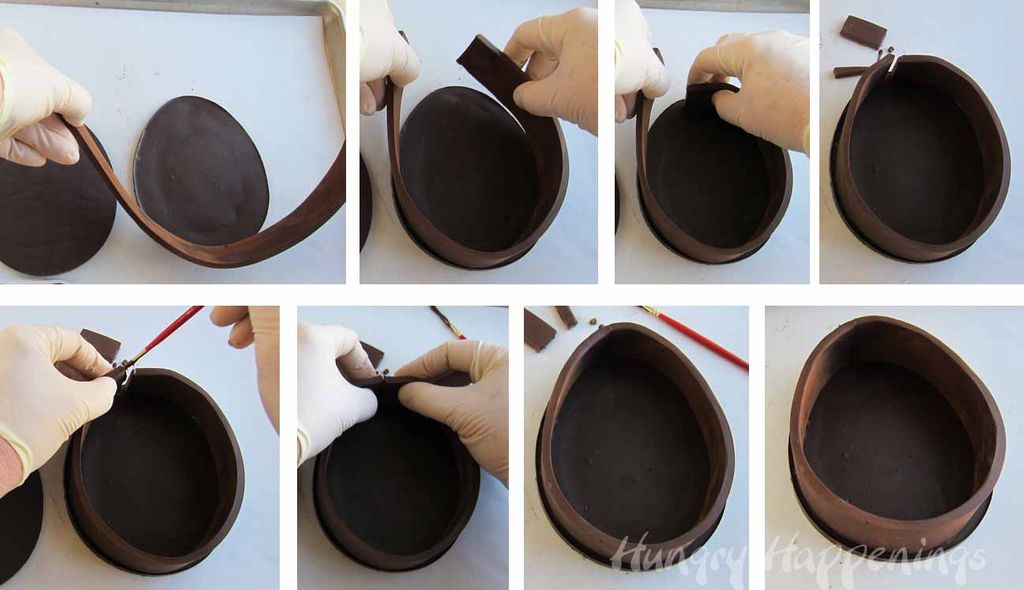
To determine approximately how long to cut your strip of modeling chocolate which will form the sides of the box, wrap a piece of kitchen twine or ribbon around your cookie cutter and cut where the edges meet. Cut off a little over an inch and use the long piece of twine as your guide. Dust a cutting board with cocoa powder. Roll dark modeling chocolate into a long rectangle that is 1/4" thick. Set the piece of twine across the length of the modeling chocolate. Use a ruler as a straight edge and a pizza wheel or knife to cut a rectangle out of the modeling chocolate that is the length of the piece of twine. You can make your box shallow (1/2") or deep (3") depending on what you'd like to fill the box with - so cut your rectangle accordingly. My box is about an inch deep so my rectangle is about 15"x1".
You now want to attach the strip of modeling chocolate to one of the chocolate eggs. Choose the nicest looking chocolate egg to be the top of your box. Dip a fine tip paintbrush into melted chocolate and paint it all along one long edge of the modeling chocolate strip. Work quickly, so the chocolate doesn't harden.
Attach the modeling chocolate strip to your egg shaped base. Pick up the modeling chocolate strip in both hands. Set the painted edge down on the chocolate egg. Bend the strip to match the shape of the egg. Set the strip on the egg about about 1/8" inch from the edge. Press it down to secure all but one end. You will need to cut off some of the modeling chocolate so that the ends meet up together without overlapping. Paint some chocolate onto the edge of the modeling chocolate strip to glue the two ends together. Press them until they hold together. If your modeling chocolate sides are not securely fastened to the base, paint some chocolate all along the inside edge where the modeling chocolate strip meets the chocolate base. This will help secure the two pieces together. Use a pastry brush to brush any excess cocoa powder off the modeling chocolate. Your modeling chocolate will harden as it sits and will be sturdy enough to hold up the box lid. If you've made your sides really deep (over 2 1/2") and you want to make sure they hold up well, you can paint chocolate all over the modeling chocolate to give it more support, just as a precaution.
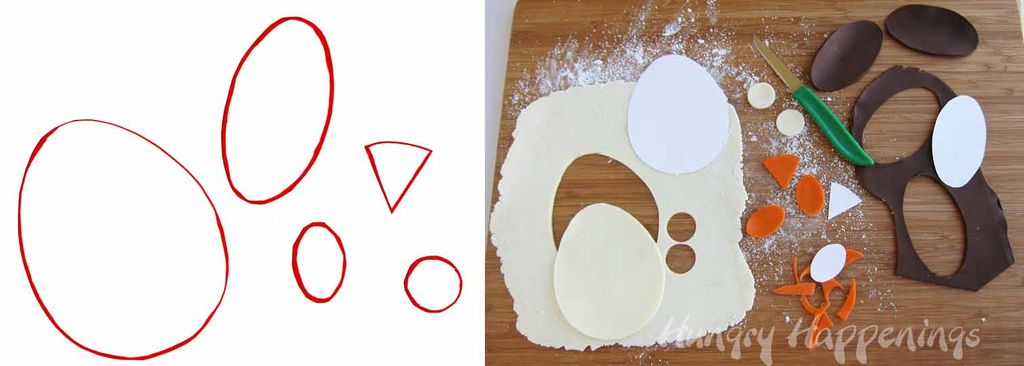
Download and print the penguin decorations template on paper or card stock. Cut out around each shape. If your egg shaped box is not 6" you will need to adjust the size of the template pieces to fit your egg box.
Dust a clean cutting board with powdered sugar. Roll out some white modeling chocolate to about 1/16" thickness. Set the largest cut out oval and the small circle on top. Use a knife to cut out around each shape making one oval for the white on the penguin's body and two circles for the eyes. Pinch off a small amount of white modeling chocolate and color it orange (detailed instructions here.) Roll out the orange modeling chocolate. Set the smallest oval and the triangle on top. Cut out around each shape making two ovals for the feet and one triangle for the beak. Roll out some dark modeling chocolate and cut out two of the medium ovals for the wings. To make the pupils of the eyes, pinch off two small bits of dark and roll into balls. Flatten into small circles.
Decorate the chocolate egg shaped box lid. Brush a small amount of corn syrup on the back side of the large white egg and press in onto the chocolate lid. Lightly brush corn syrup on the back of the orange ovals and attach them to the base of the white egg spaced about an inch apart for the feet. Attach the orange triangle beak at the very top of the white oval. Attach the white eyes then add the pupils. Shape the two dark ovals into wings, by curving up the edges. Brush corn syrup down the center on the back side of the wings and press them onto the chocolate egg on either side of the white oval. You can attach your pieces using chocolate instead of corn syrup, but it will show through the white decorations slightly.
Pour melted and tempered white chocolate or melted white confectionery coating/candy melts into a disposable pastry bag and cut off the tip. Pipe white chocolate into the cavities of your snowflake mold. You can spoon the white chocolate into the cavities, if you prefer.
Tap the mold on the counter to level the chocolate and remove any air bubbles. Refrigerate if using white chocolate and freeze if using confectionery coating/candy melts just until the snowflakes set up, about 8-10 minutes. Turn the mold upside down and allow the snowflakes to fall out onto the counter. You may need to bend the mold or press on the backside of the mold to release the candy. If the candy wont release, it may not be set. Chill longer until they do release.
Fill your chocolate box with white chocolate snowflakes. Set lid on top. Wrap in clear cellophane or package in a gift box to give as a gift or simply set out and allow your family and friends to enjoy the candy inside the box. The entire box can be eaten - just break off pieces and enjoy.
Question & Answer
Question: What is the correct order of the images?
Choices:
    |
| (A) |
|
|
| (B) |
|
|
| (C) |
|
|
| (D) |
|
|
|---|
 (D) (D) |