Question ID: 3000-13760-0-6-7-8
Recipe Description
Make the topper and bake the cake the day before they are to be consumed.Model the naked bodies out of marzipan (a delicious edible modeling dough). Since I was pressed for time I bought mine ready-made, but marzipan paste is fairly easy to make with finely ground blanched almonds and powdered sugar.I have a simple modeling tool, but you could probably manage with tooth picks and small spoons. This is your time to shine and create your own sculpture, but I'll share a few tips which helped me:It is better to cut out material than to add it... in other words, your piece will be more solid if you squeeze and tug and bend and cut a single piece than if you add each bump as a separate chunk of marzipan. This is especially true for small pieces, like the nose, which will be much better if you create it by forming the holes under the eyebrows and by rounding the cheeks. Obviously there are exceptions: hair and boobs were stuck on to the scalp and torso, arms were added later after I dressed the figurines with fondant -- but whenever possible, try to chisel a piece down rather than build it up.Once the body is carved to look about right trim off some of the flesh. Otherwise the fully dressed figures will be considerably chubbier than you intended. Fondant adds a good 20 visual pounds to the bodies. I discovered this too late, but luckily my newlyweds had a great sense of humor.Don't combine the two figures even if they will eventually merge into one piece... it's easier to dress them when they're separate.Carve the body and head in two pieces, that way you minimize the risk of damaging one while working on the other... then reinforce the connection with a toothpick to make sure the head doesn't roll off. Also, inform the couple about the toothpick before allowing them to eat the topper.
Fondant, an elastic sugary dough, is also easy to make from scratch but since this was my first time experimenting with the medium and didn't have much time, I played it safe and bought some in a tub. I used a little under 2 lbs for this whole project.Knead a small chunk of fondant to soften it up, then roll it flat between two sheets of parchment paper. You want it to be as thin as possible, but thick enough to handle without tearing; about 1/8" thick.I didn't use a pattern, just guesstimated piece sizes and shapes, lightly draped them over my figures, took the pieces off and trimmed them as needed then put them back on, this time pressing it against the marzipan where I wanted it to stick, or pulling it where I wanted it to look like flowing fabric. I then did a little additional cuts directly on the bodies, and added a few silver sprinkles as "jewels"
Put your figures together and add body parts as needed.Paint facial features and hair with a fine paintbrush and food coloring, which you can dilute with water if desired (I wanted 2 tones of brown hair, so one head was pure brown food coloring, the other was diluted).
I used the same recipe as my Panda Cake, adapted from a 1950s edition of Betty Crocker:Prepare cake pans (one 9" pan, one 7.5" one 5.5" and one 3.5" pan) by greasing them with butter, then dusting them with flour.Devil's Food Cake2/3 cup soft butter (or use 1 stick of butter and 4 tablespoons of shortening)1 2/3 cups granulated sugar3 eggs at room temperature2/3 cup cocoa (the unsweetened dark kind, preferably not dutch processed, to get the best color)1 1/3 cups cold water2 1/4 cups sifted cake flower or 2 cups all purpose flour1/3 teaspoon baking powder (i.e a heaping 1/4 of a teaspoon)1 1/4 teaspoon baking soda1 teaspoon salt1 teaspoon vanilla extract1. Preheat oven to 350° F2. Cream the butter, add the sugar and cream until light and fluffy. Add the eggs, one at a time, beating after each addition until well blended. You can't over-beat it at this point, so leave the mixer on while you do steps 3 & 4.3. Blend together cocoa and water. Set aside. 4. Sift the flour with the baking powder, soda and salt. 5. Add 1/3 of the sifted dry ingredients then 1/3 of the cocoa water to the butter mixture, stirring slowly (and briefly) after each addition. Do not over-beat. Do this two more times. Again, just mix until the ingredients are blended together, do not over-beat. Mix in the vanilla extract.6. Pour into your prepared pans, filling the pans up about 1/3 of the way.7. Bake about 25min for the smaller pans and about 30-35 minutes for the larger ones, till thin knife or toothpick comes out dry.8. Allow the cake to cool for about 10 minutes before taking it out of the pans. (avoid loud noises when it comes out of the oven or the cake might collapse -- trust me, it does happen).
Although the instructions are simple, this deserves its own step because it is pretty important: unless you've got a fabulous oven with super even heat, chances are when they rise, your cake layers will not be perfectly level. If you're just working with 2 layers and you don't mind the lopsided look this is fine, however a 4 layer cake will amplify all the imperfections. Buttercream can be a slippery cement (especially in hot weather), so unlike the tower of Pisa, your towering cake might come crashing down at the worst possible moment. So take the time to level it.Put the cake layer on a flat surface, use a long, sharp blade and cut off the lopsided top to make the cake as level as possible. Then I prefer to flip it over so the crumby side is facing downwards and I can frost the smoother side.
Prepare yourCream cheese vanilla or chocolate buttercream frostingOne 8oz package of cream cheeseOne stick of butter (1/4 pound)One cup of powdered sugar2 teaspoons of vanilla extract (or 2 ounces of unsweetened backing chocolate, melted on a double boiler and then cooled to room temperature)Allow the butter and cream cheese to soften to room temperature, and beat them together until smooth and well-blended. SLOWLY stir in the powdered sugar, bit by bit (unless you actually WANT your kitchen and your entire person to be dusted in sweet powder). Add vanilla (or melted chocolate), and keep on beating till it's nice and fluffy. You can add more powdered sugar if you like -- I generally prefer frosting which isn't overly sweet, but some people add as much as a pound of sugar!Do not frost your cake layers until they are 100% coolFrost top first and then the sides, and make sure the layers stay nice and level. Especially if it's hot, chill in the refrigerator for al least an hour or overnight, then finish the decorating and assembly on the wedding day.
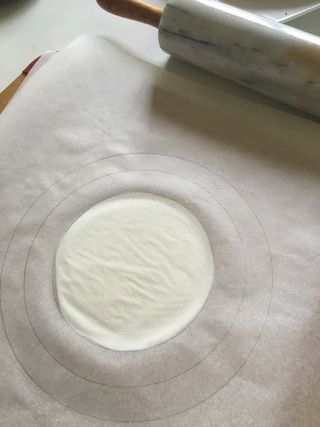
This was my first attempt at working with fondant. I'd always felt intimidated by the technique, which makes everything look so smooth and perfect -- but I watched a video and now I feel a little silly for putting it off for so long. It's really not that hard!Clean your work area and all your tools (including your hands, of course).Measure your layers: mine were all about 1" deep, so I added 2" to the diameter and drew circles on some parchment paper with a compass as a guide to help be roll the fondant to the right sizeAs described in step 2, start by kneading the fondant to soften it up.Place it on a sheet of parchment paper and center the sheet which you had marked with the circles on top of your piece of fondant, with the marks facing up. Roll it out till it's the desired size and thickness. If your chunk of fondant is too big, roll it until you get the right thickness then trim it down to your circle. If you didn't use enough fondant and you can't roll it out to the right size, add an extra piece in the center and keep rolling till it's right. Every once in a while pull off the top layer of parchment paper, reposition the fondant, then put your top sheet back on. This will prevent the fondant and paper from sticking and wrinkling. Though I didn't need to, you can also dust with powdered sugar.The lady in the Wilton test kitchen draped the fondant over her rolling pen to position it over her cake. I didn't need to do that because my layers (and the fondant) were smaller and more manageable. I just picked up the fondant with my hands, draped it over the buttercream frosted layers, smoothed the fondant over the top (again, just with my hands) and edges then trimmed the bottom. You do have to be careful because once it hits the buttercream you can only stretch it a bit -- you can't reposition it.
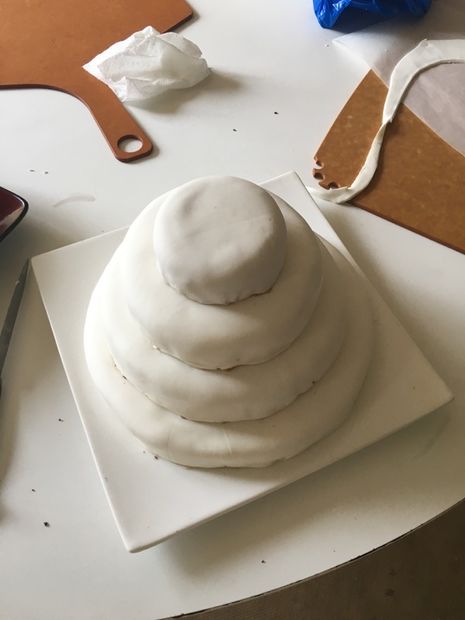
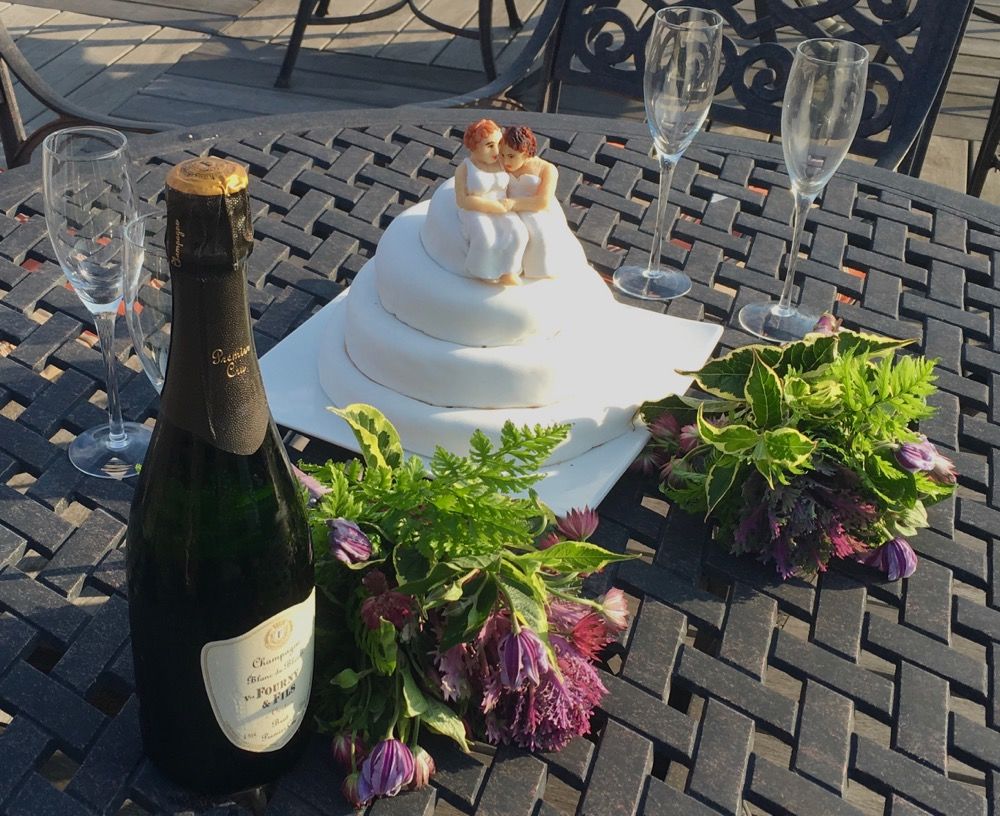
After covering all my layers with fondant, I stacked them on top of each other, using toothpicks to hold them in place. This was a little stressful, because what with the crumbs, and buttercream and toothpicks, the layers HAVE to be perfectly centered on the first attempt. You can't reposition them. I started with the top (smallest) layer. That one was a piece of cake.Then I lifted the two top layers and dropped them on the third. I was sweating a little, but all went well.The last layer nearly gave me a heart attack, because I was lifting up most of my cake -- but WAIT!As I'm writing this, I realized that I did it all wrong. I should have started from the bottom up. Please learn from my near-mistake. Although I did successfully stack my cake layers, this was just a matter of dumb luck. It could have been a disaster. It was easier at first to start stacking from the top, but it is MUCH wiser to begin from the bottom.In fact, if you stack the layers from the bottom up, it might be a good idea to skip the toothpicks and replace them, after all but the top layer is in place, with a couple kebab sticks instead, going all the way through the cake. Trim the sticks so about 1/2" sticks out of the top you can then hide them with the top layer.Place your happy couple (with a few toothpicks up their rear end) on the cake last.
My original intention had been to add buttercream piping along the seams, or maybe cut a fondant ribbon or add other decorations, but with temperatures rising to the high 80s, the buttercream underneath was softening. The less I touched the cake, the better. You can't really refrigerate fondant because that makes it harden, which makes it difficult to cut and less pleasant to eat. Also, I ran out of time. Don't forget, when you're baking for any event, that you need to safely transport your creation. Luckily in this case I baked so close to the venue that I just had to carry the plate upstairs, but if you can't do that, plan your transportation strategy ahead of time.Also, very important, don't forget to remind everyone about the toothpicks!********************************************You can see more of my (paper) creations on my website, including a zero calorie slice of cake which will never go stale, though it will fold flat.
Question & Answer
Question: Select the incoherent image in the following sequence of images.
Choices:
 |
 |
 |
 |
|---|---|---|---|
| (A) | (B) | (C) | (D) |
|
|---|
 |