Question ID: 4000-5420-0-1-6-12
Recipe Description
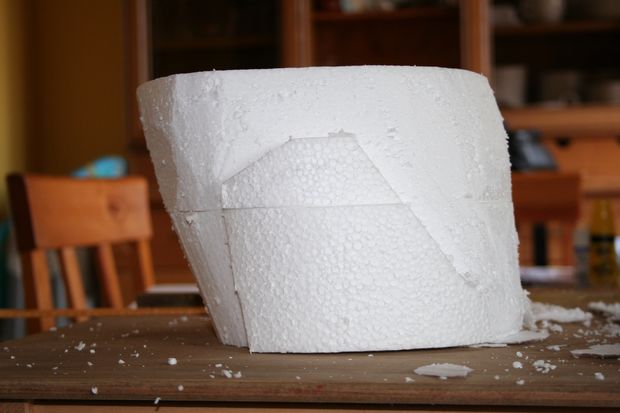
Materials used-2 dummy cakesGlueLogic would normally dictate that you use your lighter materials towards the top, especially when making a cake like this where the angle of the body and the height were instrumental to my design. I prefer to have as much of my cakes to be as edible as possible but because I was determined to have some height to this cake, I decided to use some dummy cakes so there was less chance of there being leftover cake that would end up getting wasted. I also decided they would be best at the bottom but there is no reason you couldn't make it all cake.I used 2 round dummy cakes and glued them offset because of the angle of the body. Make sure to use a suitable glue. Leave to dry.I used a bread knife to carve the dummy cakes, referring to pictures and standing back occasionally until I was happy with the shape.Carving the dummy cakes creates a lot of mess so make sure you clean up thoroughly before moving onto the edible parts.
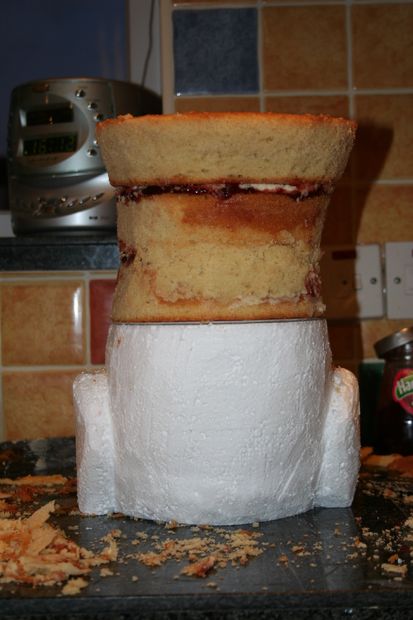
Materials used-3 vanilla sponge cakesRaspberry jamVanilla buttercream Cake boardIn this step we are assembling the cakes. I used a cake board that was similar in size to the top of the carved dummy cake. I placed the first of the small cakes on the board (it's not stuck to the board at this point as it allows for easier assembling later if they are separate) and then sandwiched the other small cake on top with jam and buttercream followed by the larger cake which was roughly lined up at the back so it overhang the sides and front.Once stacked, it's time to carve them into shape, again I used a bread knife and referenced photos as well as stepping back occasionally until I was happy. As you can see from the photos, I decided to shape the 2 smaller cakes before stacking and shaping the large cake on top.TOP TIP: Make sure you use a cake recipe that results in firm sponges that can withstand some carving, something similar to Madeira cake. (Same goes for the chocolate sponges)
Materials used-3 chocolate sponge cakesChocolate buttercream Cake boardAs with the vanilla cakes, this is just a case of sandwiching the cakes together with chocolate buttercream. I didn't stick the cake to the board as it will be easier to assemble and dowel if they are separate.Carve into the rough shape of the upper body.
Materials used-Carved dummy cakeLarge rectangular cake drumGlueHeavy weights Glue the dummy cake to the base and leave to dry, preferably with something heavy to weigh it down.
Materials used-Cake baseVanilla cakeChocolate cakeDowels Once the dummy cake is firmly glued to the base, we can start assembling the cake part of the body.I used a 1/2" thick wooden dowel as the main support dowel that went straight from the base up into the head. This is to reduce the risk of tipping over due to the angle of the body. You can glue this dowel into the cake dummy if you wish but it's not essential as it should be firmly implanted.When you have the main dowel in position, make a hole in the cake board on which the vanilla cake will sit on. One way to achieve this is to use some tracing or greaseproof paper, make a hole in the appropriate place, put in position and roughly trace the top shape of the dummy cake and then transfer to your board where the hole needs to be.Push board into place on the dowel.Now place the vanilla cake into position . You can use whichever method you prefer to do this, I just eyeballed it.To support the weight above, I used drinking straws, I have found these work really well as dowels as they support the weight, are easy to cut and easily spotted.Repeat for the chocolate cake board and cake.I gave the entire cake a covering of buttercream, known as crumb coating.
Materials used-Rice Krispies Marshmallows ButterThis was the part I was dreading as it could make or break the cake.Melt marshmallows and butter in pan, stir in Rice Krispies. You have to work fairly quickly before it starts setting but be careful as the mix will be hot, you will have to wait a little until you can handle it.I started by making a ball and then added in bits that were then shaped by hand.Before the mixture became unworkable, I shaped out the legs so I wouldn't have to use thick amounts of icing.
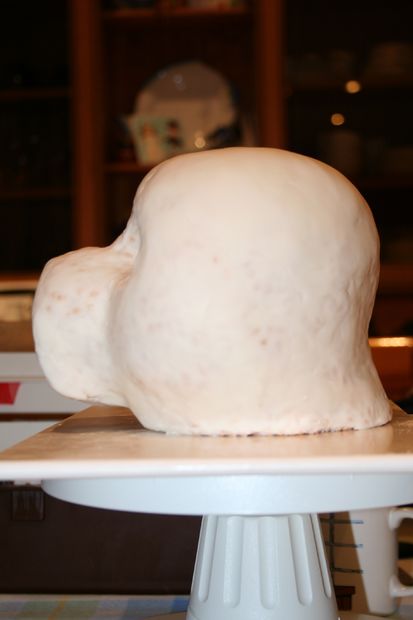
Materials used-Sugarpaste icingOnce I had the rough shape of the head, i dampened it with water then I covered it with sugarpaste icing to smooth it out and to give me a good plain canvas to work with. You could possibly use something like royal icing to get the same effect.I built up the layers on certain parts so the shape was nearer to the final shape I was after.
Materials used-Sugarpaste icingI built out the back legs by sculpting them with uncoloured icing, stuck them to the framework I'd already made and then adjusted the shape until they looked right. There was still the final covering to go on so there's still time and room for any corrections and adjustments to be made.
Materials used-Sugarpaste icingFood colouring For this part I took a large amount of icing (I don't remember how much exactly but it must have been around several kilos) and added a few different food colourings - shades of brown, red and orange. I prefer paste colours as they give strong, vibrant colours and don't alter the consistency too much.This took quite a bit of kneading and was definitely a workout but I didn't want to risk running out of icing and having to knead more icing and trying to colour match.
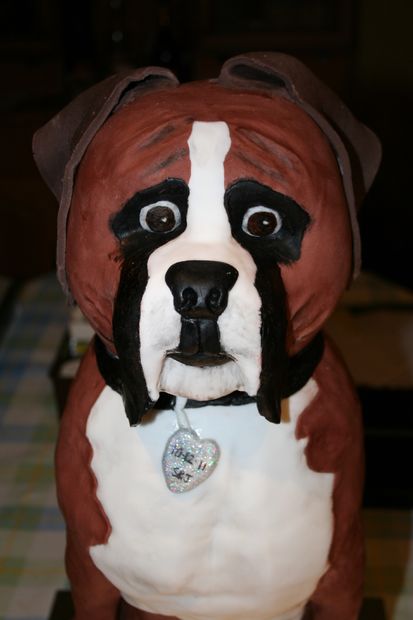
Materials used-The headRoyal icing Cake boards/drumsBrown sugarpaste White sugarpaste Food colouring - black and dark brown Paintbrushes I began by sticking the head with royal icing on a cake drum and a few layers of cardboard that I had already made holes in for the main dowel that runs through the cake. I then rolled out some brown icing. I tend to use water as my glue but you can make or buy edible glue if you prefer. I stuck the icing over the appropriate areas of the head. Next I concentrated on the white parts of the face - the stripe down the middle of the head and the muzzle area. These were shaped by hand and stuck in place.I then made the parts that surround the eyes and painted them black. You could just use pre-coloured icing if you prefer, I personally wouldn't try and colour icing black myself as it's very difficult to get it black enough.Next came the nose, followed by the mouth and jowls which were all modelled out of icing and painted black. The eyes were next, made from white icing and the iris and pupil painted on.Finally I painted on some shading in the folds and on other parts of the head where I thought it was needed and applied an edible varnish to the eyes and nose to give them a wet look.
Materials used-The bodyBrown sugarpaste icingWhite sugarpaste icingI started with white icing and rolled out a large rectangle, I then roughly cut out the shape I was after. I brushed some water on the corresponding area on the body, dusted the icing with icing sugar and rolled it around the rolling pin. Beginning at the top, I stuck the top part of the icing in place and slowly unrolled the icing while pressing it in place. I then adjusted and corrected the shape.I then tried to do the brown icing in one go by rolling out a very large circle and having draped it over my arms after dampening the surface of the body, attempted to position and stick it in place but as I was working by myself and because of the weight of the icing, gravity had other ideas! Reassessing the situation, I decided the best approach would be to do it in sections, this would result in some obvious joins but I knew I could reduce their visibility by using a wet finger and/or paintbrush. I started with the back section and then went onto the back legs followed by the sides and then the front. I then went over the edges where the sections met and blended them together.
Materials used-The body2 wooden dowelsBrown sugarpaste icingWhite sugarpaste icingRoyal icing (used as a glue)The finished headFood colouring- black & silver The end is almost in sight, time for the finishing touches and to make it look more dog-like.I rolled out some brown icing into a long sausage shape for a tail, because the body is positioned on the back half of the board, the placement of the tail was practically decided for me. The tail was then tipped with some white icing.Next came the front legs. I decided to use thick wooden dowels but you could also use PVC pipes if you wished. These were dampened with water, brown icing was rolled out fairly thick and also brushed with a little water and then wrapped tightly around the dowels. These were then positioned in place with royal icing and water and icing applied to cover where they joined the body and blended to hide the joins.The feet were next to be modelled. These were shaped from white icing by hand and a few modelling tools and then stuck in place.To complete the cake, the head is finally attached, because we already have the head mounted on a base with the hole in it, it's just a case of applying some royal icing (or other edible glue) on top of the body and bottom of the head and pushing the head down on the main dowel.To finish the cake I made a collar to fill and cover the slight gap between the head and body which I then painted black. I then grabbed some more brown icing, kneaded in some more food colouring, mainly dark brown and a little black so I ended up with a darker brown icing, rolled it out and cut out a pair of ears. These were left to dry out very slightly so they held a bit of shape to them when I attached them to the head, these were stuck on with a little royal icing but mainly with water.The finishing touches were a little shading on the feet and a personalised heart tag on the collar.The final height worked out to be around 3 feet.
So that completes this Instructable. If you made your own dog cake, you hopefully can relax now with a couple of stiff drinks. However, if you're like me, you may now have the scariest, almost heart stoppingly nervous journey of your life, delivering the cake (& cheesecakes) to the venue. I was so surprised and grateful when I got to the venue and checked in the box to see it was all in one perfect piece as I had convinced myself that the head must have fallen off and the front legs would be in different places!Feel free to ask any questions you may have and I'll do my best to answer them. If you do make your own dog cake, inspired by my Instructable, I would love to see pictures of them. Thank you for reading my first Instructable. I am entering this into the Deceptive Desserts contest so if you enjoyed this Instructable, please vote for me.
Question & Answer
Question: What is the correct order of the images?
Choices:
    |
| (A) |
|
|
| (B) |
|
|
| (C) |
|
|
| (D) |
|
|
|---|
 (A) (A) |