Question ID: 3000-8595-0-1-2-5
Recipe Description
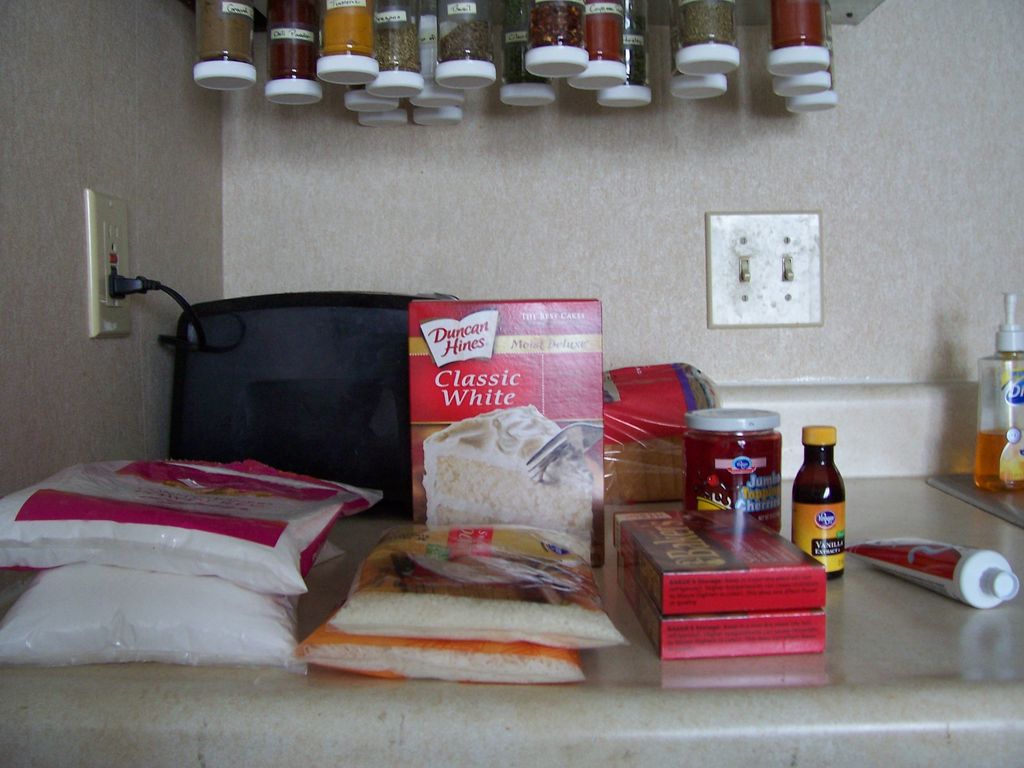
This recipe made a White Cake with Coconut Filling and Chocolate Frosting on the outside. But, as I mentioned, it can be customized to whatever you prefer. For example, the coconut filling can be replaced with any filling you want (or just frosting!), as it's not going to show until the cake is cut. As for the Chocolate Frosting on the outside, you can easily make whatever flavor you want and just combine some dark food coloring to it. Your chocolate shavings are going to cover and hide most of the icing!For this cake will need the following:
- 1 Generic Cake Mix (Any box will do. Baking from scratch is also an option. Doesn't matter!)
- 7 Ounces of Cream Cheese (cold)
- 7 Ounces of Butter (room temperature)
- 1 Teaspoon of Vanilla Extract
- 3 Cups of Powdered Sugar
- 1 Cup of Shredded Coconut (sweetened)
- 4 Ounces of Bittersweet Baking Chocolate
- 1 Tube of White Decor Icing
- 4 Ounces of Semi-Sweet Baking Chocolate (chocolate shavings will work too, if you can find them.)
- 8 Maraschino Cherries (no stems!)
- 1 Solid White Candle (longer than average is better)
Now, this recipe could be doubled very easily. My cake was only going to feed two people, so it ended up being quite small (with a lot of icing leftover!). But there is enough icing in this recipe that to double it all you need is a second box of cake mix and a second tube of white decor icing. ^_^
If you're baking your cake from scratch, I'd suggest using two 8 inch round pans, as you want your cake to have a taller appearance. If from a box, again I'd suggest using two 8 inch round pans, but, if you're like me and couldn't find any, 9 inch round pans will work just fine!
Next, bake the cake according to the directions and leave it to cool when done. TIP: After cakes have cooled for ten minutes or so stick them in the freezer. This doesn't hurt the cake at all, and will speed up the process immensely for all those impatient bakers out there. ;D
While your cakes are cooling (or baking, if you want to get really ahead of the game!) take your 4 Ounces of Semi-Sweet Baking Chocolate and start hacking at it with a knife. Aim for small shavings, with a few larger chunks in there. The end result should look like a small pile of wood chip shavings. Put in the fridge to avoid any of them melting.
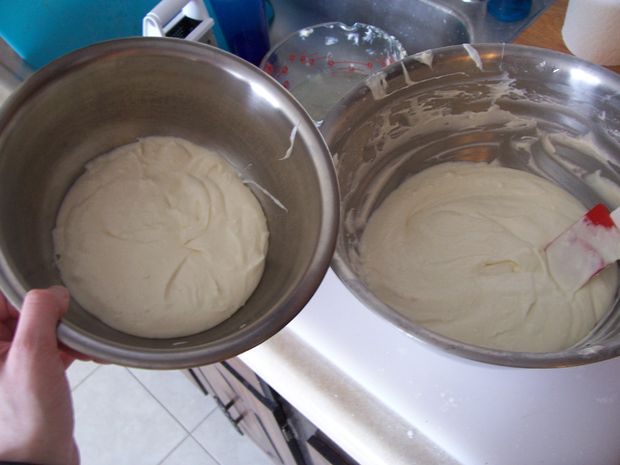
Your cake should still be cooling at this point, so next we'll prepare the Italian Cream Cheese Frosting that will make up our coconut filling and chocolate frosting.Combine the following:
7 Ounces of Cream Cheese (cold)
7 Ounces of Butter (room temp)
1 Teaspoon Vanilla Extract
3 Cups of Powdered Sugar
Mix well with a mixer until smooth and creamy looking.
Next, take 1/3 of the prepared Italian Cream Frosting and combine with 1 Cup of Shredded Coconut (sweetened). This is going to make up your filling between the two layers.
Lastly, melt your 4 Ounces of Bittersweet Baking Chocolate with 1 and 1/2 Tablespoons of Water (be careful not to heat too high!) and combine it with the 2/3 of Italian Cream Frosting that's left.
Now that all of your toppings and icings are finished it's time to check on the cake!
Check your cakes. Be sure that they're not still warm in the middle, and very carefully take them out of the pans and place on a clean, smooth surface (whatever it's going to remain on after it's finished, preferably). You want your cake to look taller than 9x9 pans allow (if making three layers, this might not be a problem), so I stacked my cakes and took my chef knife to cut about an inch off all around. It doesn't need to be perfect, because you want your cake to look a bit rough. Just be sure they still look round, as you don't want a square cake!
Really, just look at a picture of the cake from the game and eyeball it. It's a critical part in your cake, but if you go slowly you're most likely to do well.
Now, when you're stacking your cakes you want to place the bottom layer flat side down, and the top layer flat side up. As you can see from my photos my cakes were a bit puffy in the middle, so I skimmed some cake off the top of my bottom layer. This made my cake a bit lopsided after I was finished, so be careful if you attempt this. The details are what is going to make your cake perfect!
Next take a spatula, scoop a golf-balled size of coconut filling and plop onto the center of your first layer. Spread the filling to a thickness so that it won't squeeze out under the weight of the top layer, but that gives you a clear "filling" look when you stack the layers together.
When your cakes are stacked and evened out it's time to frost the cake! Again, take a golf-ball sized dollop of frosting and carefully spread it on top of the cake with a spatula. Work slowly and add more as you need it, moving to the sides after you finish the top. Don't worry about a smooth surface.
Now for the fun part!
Take your chocolate shavings out of the fridge and start applying them to the icing on your cake. Using a spatula worked best for me. Press gently to minimize the appearance of icing (more important if your icing is a lighter color). When you get to the sides of your cake shavings will start to fall all over the place. Don't worry about it. Just scoop what you can onto the sides near the bottom of your cake, and the rest can be cleaned up when you're done.
This is another critical part of your cake. So just take your time. You want it to be perfect, but a flaw here and there can be fixed when you place your cherries on top. Once your entire cake is covered in chocolate shavings take the tube of White Decor Icing and squeeze a smooth, even circle about 1/2 inch from the edge of the cake. Repeat with another circle directly across from the first. Picture the top of the cake as a clock face and the previously created circles at the 12 o'clock and 6 o'clock positions. Add two more at the 3 o'clock and 9 o'clock positions. Between the 4 existing circles add one more circle in between. You should have 8 icing circles total when you're done.
Now take 8 of the biggest, best looking cherries you can find, pat them dry (you don't want your white icing to turn red!), and gently press one into each white circle so the frosting comes up the sides slightly. Place your single white candle in the center of the cake, and voilà!
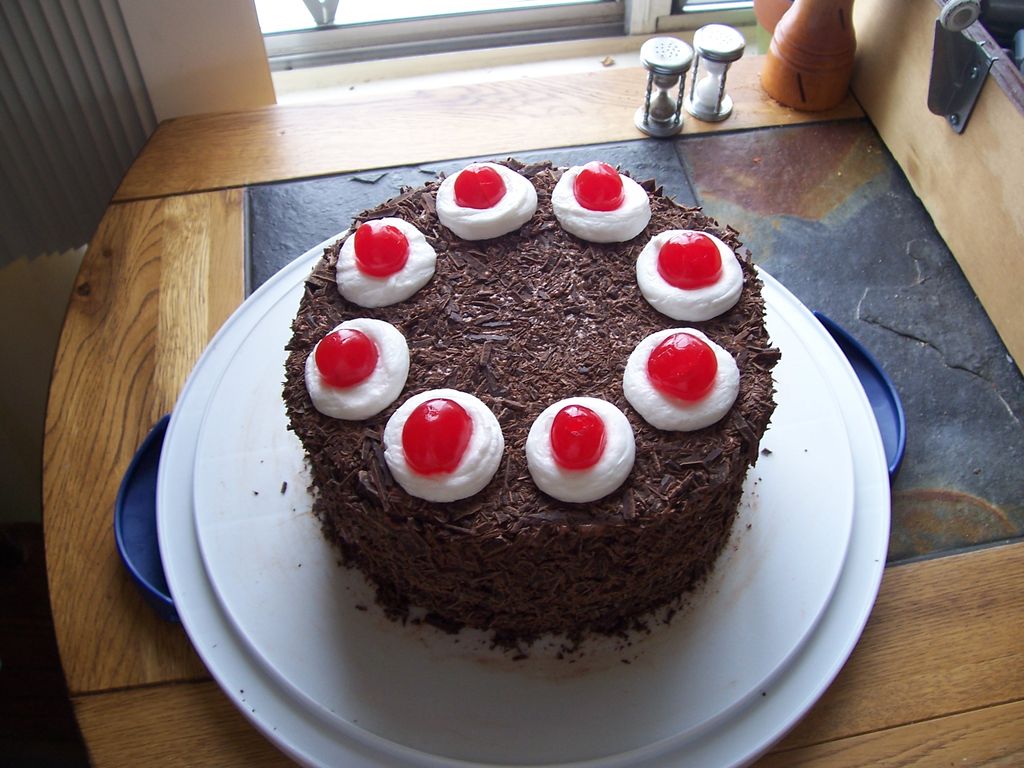
Your cake is done!
Your end result cake should look something like this. I would suggest putting the cake in the fridge until it's served, as you want to avoid bits of chocolate getting everywhere and melting. But it's perfectly fine to leave out as well. Now to bask in the glory of what you have created! Give this delicious cake to hungry test subjects, or eat it all yourself. Either way, this cake is most definitely not a lie. / / /NOTE: If anyone attempts this recipe, I'd love to see a picture of your finished cake! ^_^
Question & Answer
Question: Select the incoherent image in the following sequence of images.
Choices:
 |
 |
 |
 |
|---|---|---|---|
| (A) | (B) | (C) | (D) |
|
|---|
 |