Question ID: 4000-7417-0-1-2-3
Recipe Description
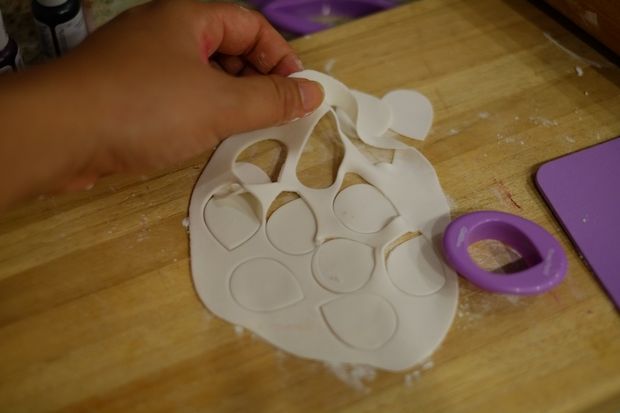
With a toothpick, tint a tiny thumb size bit of gum paste a pale yellow color. I use gel coloring paste so that it doe not affect the rigidity of the gum paste. 1. Roll small balls of yellow gum paste in your palms, paying attention to smoothness. cut your stamen to under half an inch and stick them in the balls. I used around 7 stamens for each ball.Each wild rose will have five petals. Make an extra petal for each rose so you can select the best one.2. To make petals, roll out your gum paste from the center to the edges to under 1/8 inch thick and use a petal shaped cutter to punch out your petals. There are two kinds of foams we will use for these flowers. The purple one is similar to kid's craft foam, dense and gives very little for applying pressure. we use this to thin out the petal. The pink foam is less dense and has a lot of give and is ideal for rippling the edges for a realistic petal appearance. 3. Place each petal on the harder purple gum paste foam first and roll it out with a ball modeler. Press in the middle first and roll it to wards the edges in a moon shape. You are trying to indent a petal shape very similar to the curvature of your own cupped palm. I leave a little extra gum paste around the edges so I can have more to work with for the next step.4. On the pink foam, use the same ball roller to press out the edges to create a rippled effect.5. Make a finger's amount of dusty green gum paste. Roll it out and punch out a few calyx shapes.I used spoons to create a cupping supportive shape for the roses to dry on. You could use small bowls or egg crates. I like having a little variety in the slope. the larger your vessel the more open your flower will be.6. While your petals sit for a few minutes, mix up gum paste glue. This is just pinching off a tiny bit of the gum paste and stirring water. My ratio is about a thumb nail ball of gum paste to a 1/4 cup of warm water. 7. Place the green calyx on the measuring spoon or cup. Wit ha small paint brush dab the center with your glue. add each white petal on one by one, overlapping just slightly every time you add a petal. Use the glue on the areas where the petals overlap. Brush on more glue in the center and lightly press your yellow ball in the center.8. Hope for the best. 9. Get floral wire and make a little hook on the end. Burn it on the stove so it is hot. press it into the bottom of your flower so it melts through and "hooks" in the thickest part. the gum paste should melt around it forming a permanent tomb for the wire.These took two days to dry because the center of the balls take a little bit. if a petal falls off use one of your spares to glue a fresh one back on.
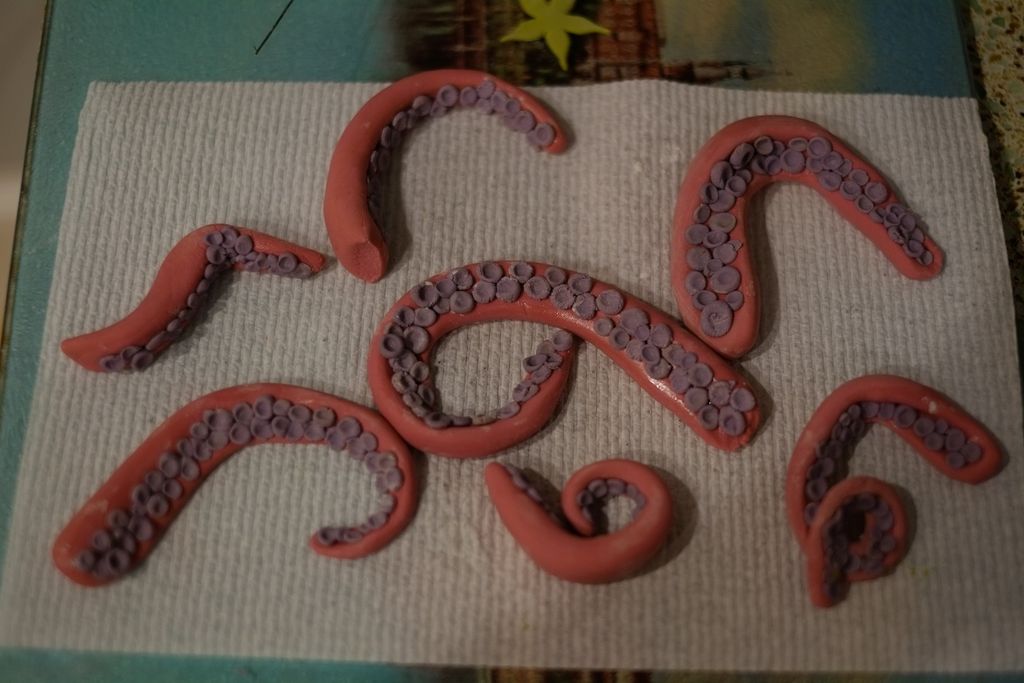
Oh my god this was monotonous to do. Look. I'm NOT a zen person. I can not really meditate. All that chat about meditating before is a big lie. I can't yoga. I just can't. If you are all namaste about stuff, this is gonna work out great for you. If not, just make a floral cake. No one will judge you. Tentacles are cool to look at though, and without them this cake would be a boring normal floral cake. I guess I lied about judging. Make the tentacles! You can do it!1.Mix up a fist and a half of fondant to a weird sickly squid color. You'll probably want to mix some red with brown and purple or blue. Mix a half a fist of gum paste to a weird underwater squid purple color these are for the suction cups.2.Roll out various sizes of squid tentacles using your pal. this is similar to making your average play doh snake shape. Taper one side, and using the side of your finger make an indentation right through the middle of the tentacle.Curl them in different shapes to evoke cephalopod movements.3.Roll out hundreds upon hundreds of tiny little purple balls.We're talking small like the size of a peppercorn. Hundreds. So many hundreds of these....4. Brush some glue on the tentacle. Using the modeling tool that is shaped like a "nub," press each tentacle into the tentacle indentation. Parallel zippering looks most natural. Dry these out for a couple of days. when you finally place them on your cake you'll find that some look better flat and some can add a lot of drama and dimension when placed vertically.
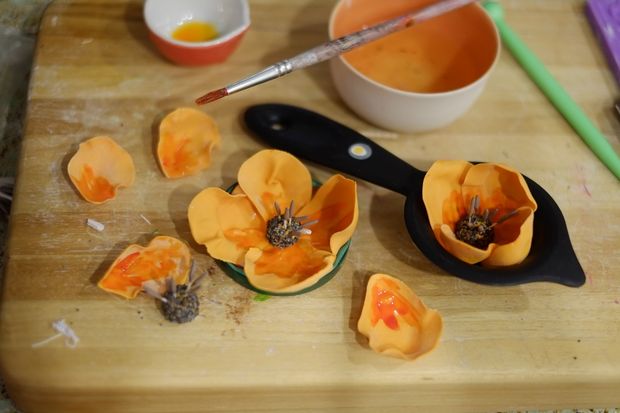
Make more! Tons more.Ivy leaves and other leaves can be cut out with cookie cutter shapes and used as is or with a little floral wire . To attach floral wire to thin pieces jsut use a little extra pinch of gum paste on the back.roses can be made by rolling a ball around floral wire in a teardrop shape and attaching individual shaped petals one it one by one.Poppies were made just like the wild rose but I rolled the style in actual poppy seeds. Yup! Pretty cool. I also mixed a little gel dye and water up to brush on the petals to add color variation. I let some dry out in jar lids and some in measuring cups to have variance in bloom shapes.The small blue and white flowers were made by pressing gum paste in a typical wilton flower mold and popping a hooked wire in the center. these were made into bunches using floral tape. be sure to used food safe floral tape. The daisies were made with a daisy shape cutter and the centers were made with a style mold.The billy balls are rolled into balls and rolled over a bumpy plastic texturizer to create the feel of pollen. These balls were also hooked on to heated floral wire and were dried upside down on my dish rack.To create floral texture for large leaves, you cut the leaves out first then press them against the veining molds before you shape them very gently on the foams. If you want them on floral wire, you can stick the floral wires directly into balls of gum paste and roll it out after, in order to have a very stable leaf on a wire that is thin. use up your gum paste completely by making spirals and x-tra decorative elements.
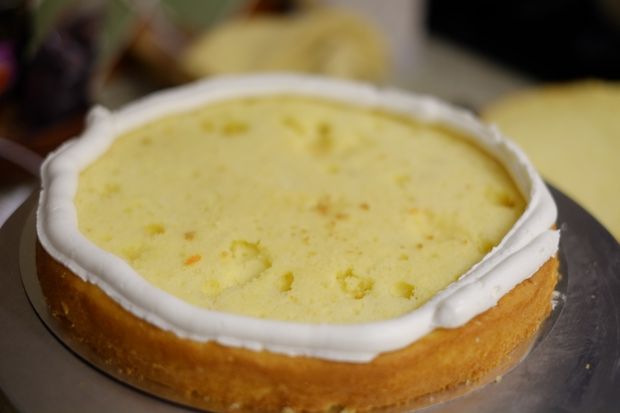
For this cake, I baked two vanilla pound cakes with orange, lemon and lime zest. I cut the cakes in half and lopped off their puffy tops for nice flat layering.The icing was a standard vanilla buttercream, but I scraped some fresh vanilla bean in.The strawberry filling was out of control however- salted caramel balsamic strawberry filling which I made up completely.two pounds of strawberriesone cup of sugarvery fancy balsamic vinegarrest of the scraped vanilla podsaltapricot jamI a saucepan melt you sugar down into a syrup and watch for ait to turn a medium gold caramel. Add half you strawberries in and simmer until it reduces into sexy jam. This took a good twenty minutes. Fold the rest of your sliced fresh strawberries into the hot jam and add a couple of spoons of apricot jam. Douse with a heavy pour of balsamic and a tablespoon of salt.To ice your cake it is best to pipe a thick circle of frosting to act as a barrier for your strawberries which are going to leak into your cake.Layer it up and frost the outside with an offset spatula. I always frost a thin crumb coat on first and refrigerate the cake for 15 mins before doing an other layer, but since we are covering this in fondant it is not as important.
Cover your cake in fondant.Do not use gum paste. fondant is soft and pliable. I usually serve my cakes by peeling the fondant off first unless someone is into eating it for some reason. fondant is not just a decorative element. it keeps your cakes study and moist and it is so great when you are transporting a cake and it has to sit around before cutting.Stick all your decor on the cake. You will want to use your glue for the flat pieces but in some cases it might be best to use a little butter cream icing. A lot of the flowers and leaves are not able to sit flush on the curved surface of the cake. icing helps that.Surprisingly, I had used the leftover bits of gum paste to shape small spirals and curly wiggle shapes. These were very useful in adding dimension and filling up empty space.So pretty! Much oooh. Much Aaaaah.
Question & Answer
Question: What is the correct order of the images?
Choices:
    |
| (A) |
|
|
| (B) |
|
|
| (C) |
|
|
| (D) |
|
|
|---|
 (D) (D) |