Question ID: 3000-9762-0-1-2-4
Recipe Description
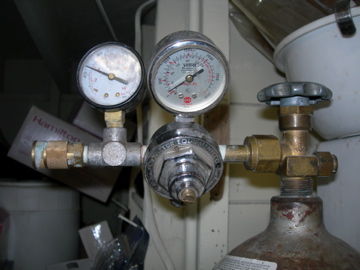
I chose this method since I had a CO2 cylinder, regulators, hoses, fittings and whatnot already in my possession. If you don't have stuff like that, then fear not. The total cost will still be less than that of the in-line carbonator devices.So gather your materials:*Plastic 2-liter bottles - they must have that ring below the neckThere are 2 neck sizes , and I have built this for the smaller, more common size.Metal plate - about one square foot should be plenty. Stainless steel is probably ideal. I used plain old mild steel, and aluminum could work if it's thick enough not to bend easily.Pipe Fittings - I'm using 1/4" pipe fittingsshort nipple (i used brass)valve (also brass)quick disconnect air fittings (2 male, 2 female) and some air hoseteflon tapeCO2 cylinder ( you can get a very small one which will last a good long time at a beer brewing supply store, or a welding supply store)CO2 regulators (also available at brewing supply store or welding supply store)wing nuts and carriage bolts (1/4" are good) about 2 inches long.some kind of gasket material. -- silicon aquarium sealant is probably best, but I have used bike innertube successfully
First measure and cut two plates of your metal.
Mine are about 1.5 inches by 3 inches.
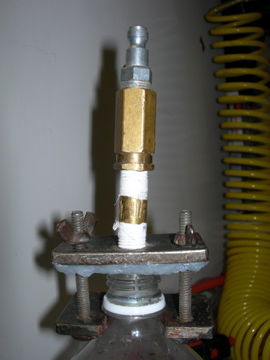
Notice the image below. You are planning to make the bottom plate with a slot in it to fit around the neck of the plastic bottle below the "shoulder", and the bolts will run up through both plates to secure the top plate against the opening in the top of the neck. The top plate will have the hole for the CO2 to be delivered into the container full of cold water.
Before you get started, put the container filled with water into the refrigerator.
Then cut your plates.
measure for the u-shaped cut out.
The neck of the plastic bottles is almost exactly one inch, so my plate is cut out to about 1 1/8 inch, which is a bit large, but still works.
So then cut the u-shape however you can. I used a cutting torch to do mine. You can use a hole-saw perhaps to start then a hack saw to finish, or perhaps you use a jig-saw or recip-saw. Whatever you have.
Next you need to drill the holes for the clamping bolts. Stack the plates, and drill both plates at once. This way your holes will be sure to line up even if they are not perfectly spaced.
Last, drill and tap the hole for your CO2 fittings. Mine are 1/4" Pipe.
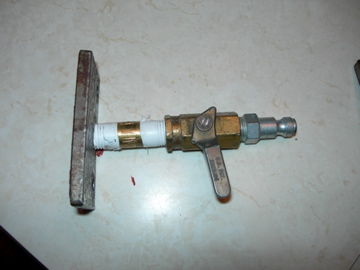
You now are ready to assemble the fittings.
The CO2 will enter the assembly through a quick-release air coupling. These are commonly used in workshops for air tools, blow guns, and tire fillers.
I added a valve so that I could detach the supply without blasting out all of the gas. It is a nice feature but not required.
See the picture, it's pretty obvious.
in order for the gasses to stay in the bottle during carbonation, you'll want a gasket.
I tried
automotive RTV gasket maker
100% silicon sealer (caulk)
glued-on bike inner tube
the bike inner tube works the best. It's not pretty.
It imparts no flavor to the product, and if you have a more food-grade gasket, that would probably be better.
I contemplated cutting up my wife's silpat cookie sheet, but I like being married.
so now you are ready to make it.Get your bottle of water from the fridge.Open the capAttach the assembly and screw the clamping screws on tight. Just tight, not overly tight.close the valveattach the CO2 lineopen the tank valveadjust the pressure on the regulator to about 50 PSIopen the valve on the bottle.Check for leaks, and hisses.Shake the bottle for about 30 seconds to a minute (more shaking == more fizz )close valve on bottle.Disconnect quick-releaseclose CO2 tank valve.open bottle valve slowlyremove assemblyenjoy bubbles.
Question & Answer
Question: Select the incoherent image in the following sequence of images.
Choices:
 |
 |
 |
 |
|---|---|---|---|
| (A) | (B) | (C) | (D) |
|
|---|
 |