Question ID: 2000-7360-0-2-3-4
Recipe Description
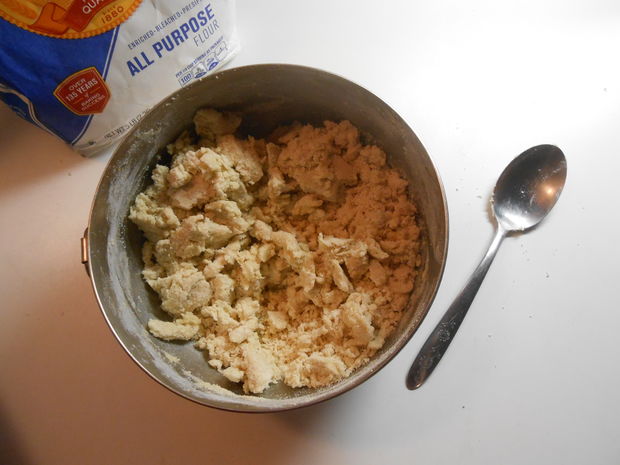
Beat together until light & fluffy:1 cup butter ½ cup light brown sugar 2 tsp granulated sugar ½ tsp saltBeat together and add:1 large egg 1 tsp vanillaFold in:3 cups flourAfter all ingredients have been mixed together to form a crumbly dough that holds together when pressed, divide the crumbly dough into two plastic bags. Form the dough inside into a disc; it should be much easier to manipulate it when it's inside the plastic. Seal it up tight, and let it rest in the fridge for an hour. Note: The pictures show me making a half recipe.
Whisk together:1 ½ cups plus 3 tablespoons flour¼ tsp baking soda ¼ cup sugar ¾ tsp cinnamon 1 tsp ground ginger ¼ tsp ground cloves ¼ tsp ground nutmeg ¼ tsp saltMix separately:¼ cup vegetable oil½ cup molasses1 tablespoon waterdash vanillaAdd liquid mixture to dry mixture, and work everything together with a spoon just until it holds together and forms a stiff dough. Wrap & seal the dough in plastic and let it rest in the fridge for an hour, or overnight.Honey-Lemon variationJust for fun, this makes a cookie with a different flavor and a lighter color. It's the worst of the three in terms of taking in texture, since it's soft and sticky, but it has a great flavor. Follow the same instructions as above, with the following changes:Replace molasses with ½ cup honeyOmit vanilla, nutmeg, cloves, & cinnamon (but keep the ginger!) Add zest of 1 lemon and ½ tsp lemon extractAdd more flour liberally, as needed
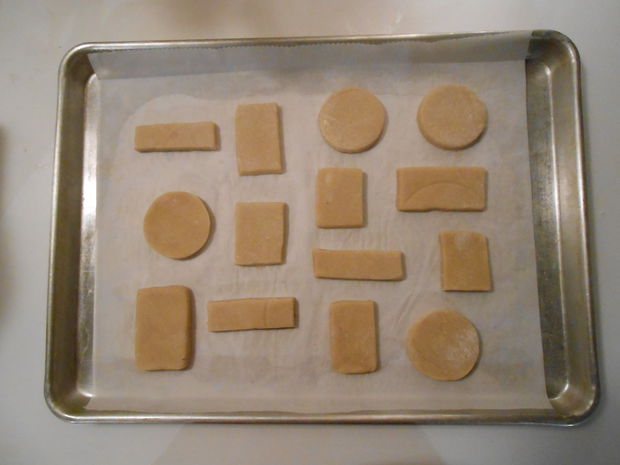
Real cuneiform tablets can be as small as a postage stamp or as big as a sheet of letterhead, but most are somewhere in between and actually reasonably cookie-sized. Rectangular tablets are usually receipts, inventories, tax documents, or personal letters. Round tablets usually contain the school exercises of student scribes, with scribbled proverbs, math problems, or simply repeated words and letters. Make a variety of sizes, and don't worry if they're not perfect shapes -- it will only make them look more realistic!Roll out dough about ⅜ inch thick, or 1 cm. This is a little thinner than actual tablets, but better for cookies.For rectangular tablets, aim for 2 x 2½ inches up to 2½ x 4 inches. Cut square and rectangles with a knife, a dough scraper, a pizza roller, or whatever else you have on hand for trimming dough.For round tablets, aim for 2½ to 3 inches in diameter. Bigger is more like real tablets, smaller is better for cookies. I stamp out circles using the mouth of a drinking glass.Any leftover dough can be molded into shape by hand, which actually gives you a more authentic look. You can form all your tablets by hand, but it takes longer to do it that way.I like to roll out and shape my "tablets" first, and then put them all back in the fridge. When it comes to inscribing them, take one or two tablets out of the fridge at a time to work on. The dough will soften up as you go, and it's much easier to work when the dough is chilled.
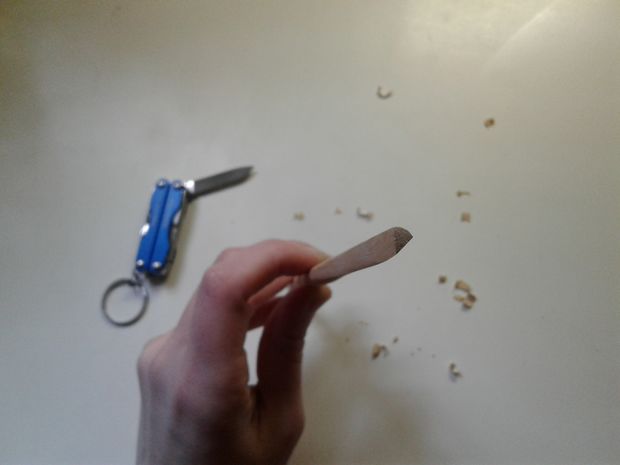
Before you can inscribe any cuneiform, you need a trusty stylus to write with. You can make an excellent and serviceable stylus out of a disposable chopstick or a small dowel rod. Using your pen-knife, shave the chopstick down so that it is flat on one side. Then make another cut at a slight angle, so that the cross-section of your chopstick is a triangle with one slightly curved side.Historically a stylus would have been made with a split reed. SEE HERE for tremendous practical and historical details, and make sure to scroll down for loads of helpful pictures.Optional: Make the other end into a point. You can do this with a pen-knife or, depending on the size of your chopstick, with a pencil sharpener. A pointy stylus was used to draw pictographs in the earliest clay tablets. Later, the line-drawings of pictographs were stylized into the classic wedge-shaped cuneiform we all know and love. The pointy end of the stylus could also be used to draw straight lines across some tablets as a guide for writing neatly, or to lightly trace out the text you plan to write so you can figure out the spacing beforehand and concentrate on making good wedge-shapes later. However, while the pointed stylus might have worked for real clay tablets, in my experience it doesn't work well with sticky dough. It just rips it up and makes a mess. I recommend using a dough scraper or knife to make the lines instead, and skipping the tracing stage.
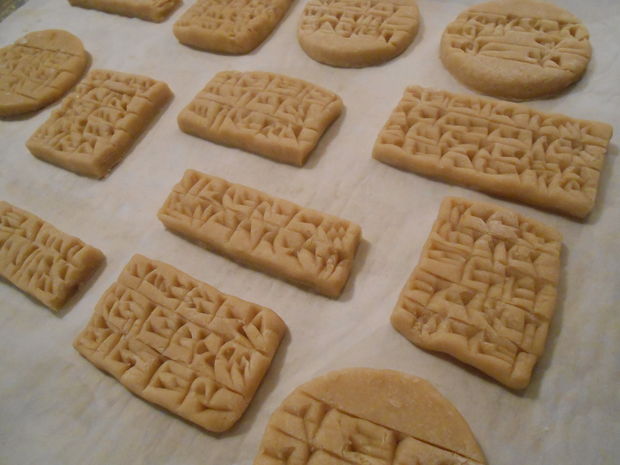
Now it's time to settle in and start writing. This is the time consuming part, and fair warning, it takes practice and patience. You may want to start with some internet browsing for inspiration. Get ready to practice your letter forms with Omniglot and ancientscripts.com. Also check out this excellent 5 min. video on Mesopotamian scribes & making the basic wedge shapes, and see here for more tips, details & pictures. You can also use a Cuneiform Translator to write your name in cuneiform (not necessarily accurate, but fun!).I recommend beginning with a large disc tablet with lines. That's how real scribes started learning, after all. Keep a small bowl of flour on hand and to dip your stylus into it regularly so that it doesn't stick to the dough as you're working. And dig deep! The cookies will puff up when you bake them and lose some texture, so exaggerate the forms at this stage.For the classic wedge shape, lead with the point of the triangle to make the deep "head" end of the wedge, and rock the shaft downward slightly into the dough to create the tail.The large < sign is called a "Winkelhaken." Hold your stylus at an angle, using the pointed edge of the shaft to make the bottom half of the sign. Then roll the stylus slightly into the dough, so that the long edge of the triangle presses into the tablet and makes the upper half of the < sign. See the third picture.Practice making all the different wedge styles, then move up to writing sign inventories like Old Persian or Ugaritic. Honestly, just writing out the various alphabets can make for great-looking tablets the size of shortbread fingers, and they're historically accurate too. Then, if you're feeling bold, look at some pictures of real tablets to copy. Keep in mind that it will take far more time than you might expect to write even something very simple, and cookie dough isn't as perfect a writing surface as clay is, so don't expect to replicate the most complicated tablet you find on your first try.The Met (great pictures and accurate information about size, date, etc) Spurlock Museum (same as above, but a bit more user-friendly) Cuneiform Digital Library Initiative (a massive hub of various collections)
Fun fact: many of the tablets we have were never intended to be preserved. Some important documents were fired on purpose, but others (like school practice tablets) just happened to end up baking in building fires and thus were preserved for posterity. Our cookies will be baked, but I fear they will not last for millenia to come.If you are making gingerbread, place the tablets on a baking sheet lined with parchment paper, and dry the dough for 12+ hours. This will help them keep their shape. After the drying period, preheat oven to 300* F and bake for 12 to 14 minutes depending on how large you've made your tablets.If you are baking shortbread, no drying period is required. Place the tablets on a baking sheet lined with parchment paper, preheat oven to 400* F, and bake for 10 to 12 minutes.When you take them out of the oven they will be large and puffy, but they'll settle back down a little bit after cooling for a few minutes. The rounded, puffy edges of baked cookies will make them resemble real tablets even more than they did before baking, at least shape-wise, but unfortunately you will lose some of the cuneiform texture no matter what.The final verdict: Shortbread wins, in my opinion. The gingerbread has a more satisfying texture to write in, but the shortbread keeps its impressions better and tastes delicious. But why choose one, when you can make both :)
As for you, Gilgamesh, let your belly be full, Make merry day and night. Of each day make a feast of rejoicing!
Question & Answer
Question: Choose the best image for the missing blank to correctly complete the recipe.

Choices:
 |
 |
 |
 |
|---|---|---|---|
| (A) | (B) | (C) | (D) |
 |
|---|
 |