Question ID: 3000-6269-0-1-3-5
Recipe Description
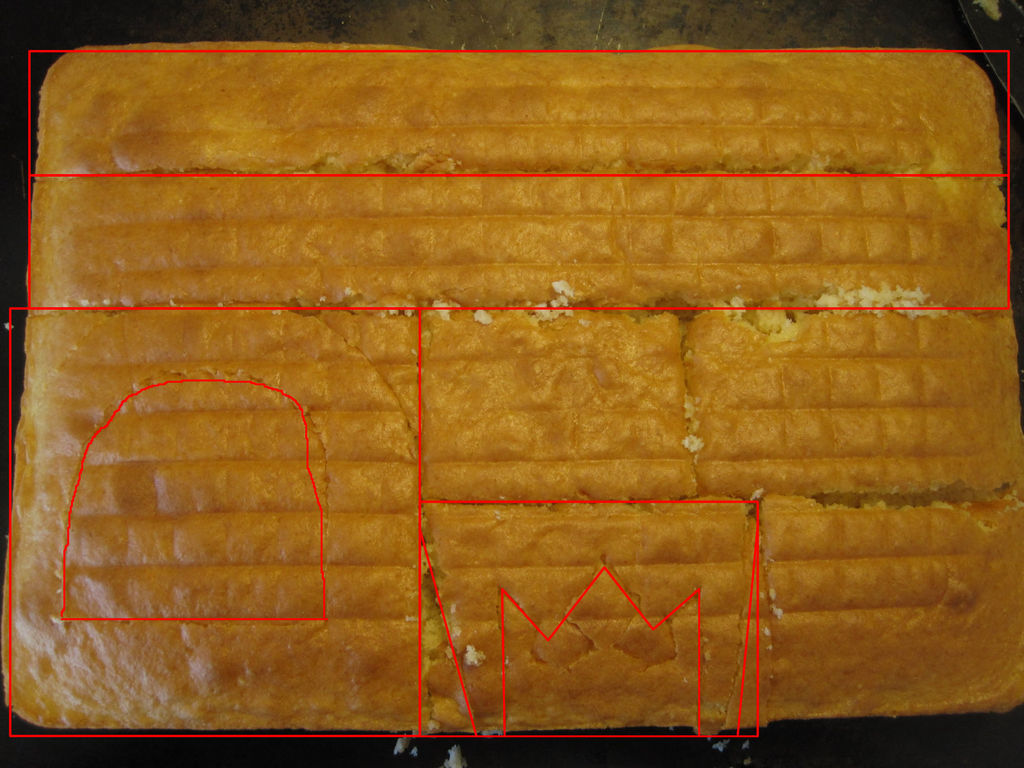
Take a look at the photo (I've tried to outline the cuts so you can see them better). For this cake, you will use the whole top strip of cake shown in the picture and part of the second strip. The bottom left corner piece was used to make the handle and the bottom center piece was used to make the blade. The rest of the cake can be put aside for you to munch on as you assemble the Keyblade Cake.
For the handle, the square cake piece needs to be rounded out on one side and the center cut out (creating a large "D" shape).
From the inner cut-out section of the handle, the center is cut out to be used. The side pieces can be discarded (eaten).
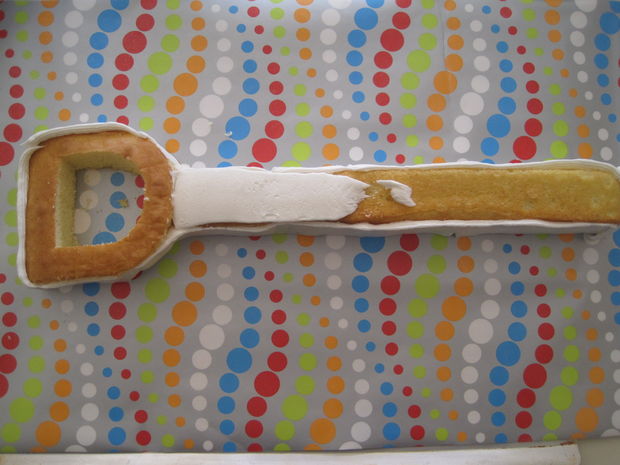
Line up all the sword pieces (except the blade) on your cake board or preparation surface (I highly recommend you decorate this cake on the surface you plan to serve it on). In the previous step, I mentioned you will use "part of the second strip" of cake. At this point, with your cake pieces assembled in front of you, determine how much of that second strip you want to use. This determines the finished length of your cake. In the photo, only about 3" of the second cake strip was used.
Remove the inner handle (to make icing easier) and ice the rest of the cake with vanilla icing. This is quick and easy using a large size 789 Wilton icing tip. Smooth down the icing. The icing will be underneath a layer of fondant so it didn't need to be really smooth and it didn't need to be applied too thickly, either.
Cover the whole sword (still without the blade) with marshmallow fondant (recipe here). Roll out small round cylinders made of fondant and place them vertically at the tips of the handle. Trim the height if necessary. This creates the protruding edges. then continue to cover the rest of the handle.
Trim a bit off the ends of the inner handle piece (the one you removed in the previous step). You may need to test the size by placing it in position. The area is smaller now that you have iced the handle and covered it in fondant. Once the inner handle is sized down to fit the new space, ice it and cover with fondant and place inside the handle.
At the top center of the handle, lay an extra piece of fondant beneath the top layer to jut out the top handle more and give it some shape.
Use trips of fondant to cover the ugly seams and add more details (like the ridges in the top part of the handle).
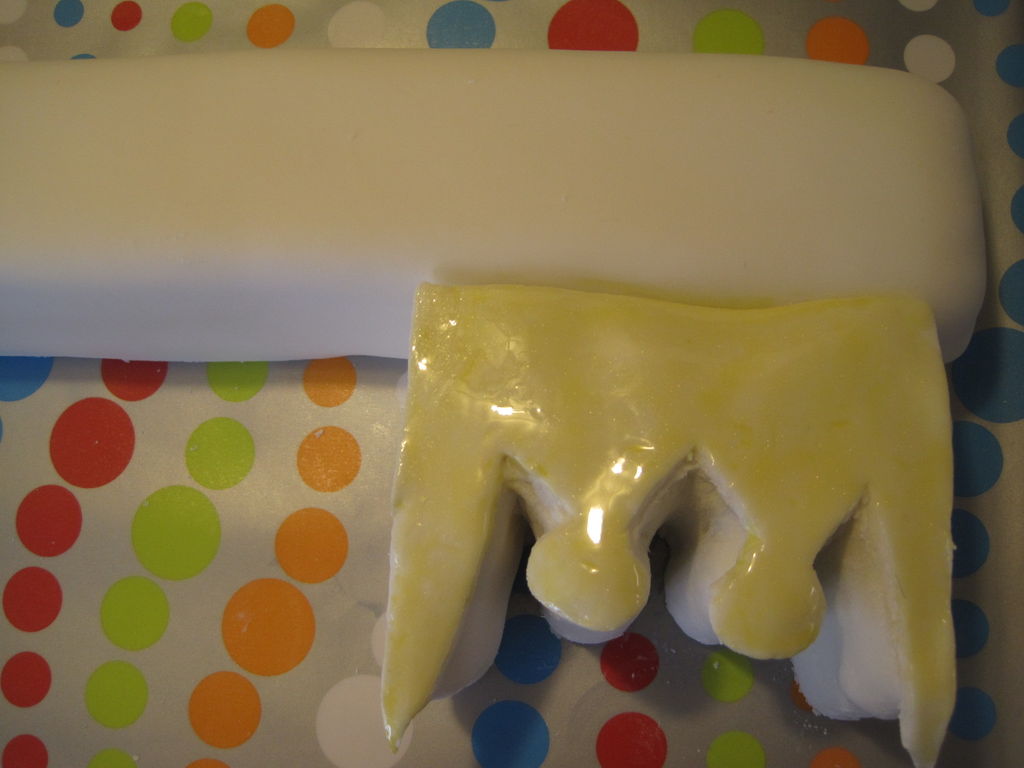
Ice the top and sides of the "blade" cake piece. Roll fondant into 2 round cylinders and place at the ends of the two inner blade tips. Roll a strip of fondant to wrap around the sides of the blade piece leaving the seam in the back (along the straight edge).
Then cut a top piece out of fondant (complete with the rounded tip details). I apologize for not having a photo of this step - the photo I have already has the "paint" on the cake.
With the final touch of the keyblade in place, you can place it at the end of the sword and start painting.
Mix about 1 Tablespoon of almond extract (you can also use vodka) with yellow food coloring to achieve the color you want. Brush the paint on the fondant all over the sword on up to the handle. Do not discard the yellow "paint". You will need it later.
For the handle, mix about 1 Tablespoon almond extract with silver Pearl Dust, found in cake decorating isles in craft stores (or use edible glitter) and a smidgen of black food coloring. Use this mixture on the outer handle area. You may need to paint this area more than once.
Once the silver areas are done, add more black food coloring to the "paint" and color the inner handle and the "bolts" in the corners of the handle.
For the chain, roll marshmallow fondant into ropes and form into rectangular chain links. Go ahead and close the links at this time even though they aren't linked together.
For the top chain hook, Roll marshmallow fondant into a rope and create a "corkscrew" to go into the end of the cake. Attach a "clasp" to the corkscrew, and then attach the base of the "clasp" to a chain link.
For the Mickey Mouse head, roll out marshmallow fondant to about 1/4 inch thick. Lightly press a 2" biscuit cutter into the fondant for the main part of the head and a smaller circle (I used a bottle cap from a sprinkles jar) for the ears. Just lightly press the circles into the fondant. Don't push all the way through. Then cut out the Mickey Mouse head.Note:Once I cut it out, I thought something was off. Then I realized that Mickey's ears were supposed to be full circles just barely attached to his head so I molded the fondant ears to make them more full circles. It looked less like a bear head then. Keep that in mind when you're cutting out your mickey head. Don't go by my picture - keep the ears a little more off the head.
The hole in the top of Mickey's head was created using a size 12 round decorating tip.
Paint all the pieces with your yellow gold "paint".
Once the paint dries, cut a hole into the end of the cake on the handle and insert the corkscrew chain piece. Cut one end of each chain link and began connecting the links lightly pressing the links to close. End with the Mickey Mouse head.
With the chain and Mickey charm in place, your cake is complete!
Question & Answer
Question: Select the incoherent image in the following sequence of images.
Choices:
 |
 |
 |
 |
|---|---|---|---|
| (A) | (B) | (C) | (D) |
|
|---|
 |