Question ID: 3000-3013-0-1-3-4
Recipe Description
The actual material cost for this build was less than I had initially expected. It's still not cheap, but it is a lot less than a comparable store-bought chiller! I've included links to the exact items I purchased and used below. The final project may cost more or less for you depending on what you already have on hand.Material:-2x 10' 3/4" type m copper pipes $24http://www.homedepot.com/p/Cerro-3-4-in-x-10-ft-Co...-2x 10' 1/2" type m copper pipes $16http://www.homedepot.com/p/Cerro-1-2-in-x-10-ft-Co...-1x 3/4" x 1/2" x 3/4" pack of 10 copper tees $18http://www.midlandhardware.com/232298-bulk.html-6x 3/4" x 1/2" x 3/4" individual tees $12 + $6 shipping for all the teeshttp://www.midlandhardware.com/232298.html-2x 90 degree 3/4" copper elbow $6http://www.homedepot.com/p/3-4-in-Copper-Pressure-...-2x hose clamps $2http://www.homedepot.com/p/Everbilt-1-2-1-1-4-in-H...-solder 9$http://www.homedepot.com/p/Forney-1-8-in-1-4-lb-Le...-flux 5$http://www.amazon.com/Rectorseal-14000-1-7-Ounce-N...-garden hose (a free scrap hose is fine. You just need the ends.)- six feet of silicone tubing $12http://labelpeelers.com/1-2-high-temperature-silic...Total ~$110Tools Used:-measuring tape-pipe cutter (much easier and cleaner than a hack saw)-blow torch-sand paper-deburring tool (optional)-dremel
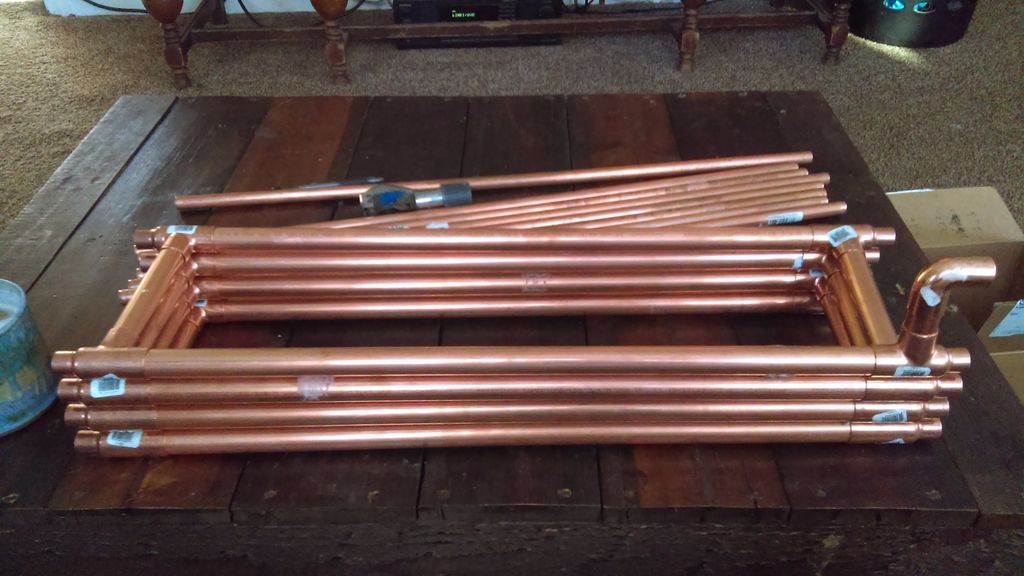
Once you have amassed your collection of pipe and fittings it's time to get cutting! Using a pipe cutter (or similar tool) cut the pipe to the lengths listed below. You can make the chiller shorter while using the same amount of copper pipe, however you'll need more tee fittings (and silicone tubing), and you'll want to make sure the length of the inner pipe is evenly divisible by 10' to maximize your copper usage. For example, you could shorten the 1/2" pipe to 24" rather than 30" and have 10 sections rather than 8. This will then require another 2 tees and you'll need to adjust the 3/4" pipe to match the new size. I will list the measurements I went with.-8x sections of 1/2" pipe, 30" long. Since each pipe is 10' you'll get 4x sections from each piece.-8x sections of 3/4" pipe, 23" long. -7x sections of 3/4" pipe, 6" long.Cut 4x 23" sections from each 10' 3/4" pipe. Cut 4x 6" sections from one 3/4" pipe and 3x 6" sections from the other. This will leave you with 1 extra 4" section and 1 extra 10" section. Use the 4" section for the final 2 pieces listed below.-2x sections of 3/4" pipe, 2" long. These will be for the connection between the first and last tees, and the 90 degree elbow fittings for the water inlet and outlet.At the end of all the cutting you should be left with the one extra 10" section of 3/4" pipe as a spare piece.By this point you should have all of your copper tubing cut and ready to do a dry-fit test! It was at this time that I found my first problem. My tee fittings (and most others by the sounds of it) have a tiny ridge or collar on the inside which prevent the 1/2 copper tubing from sliding completely through the fitting. Next I'll explain how I got around that problem...
Once I had all my pipe cut to the right lengths, it was time to prepare it for soldering. First, I used what is called a deburring tool which scrapes the inner lip away from the copper to make a nice smooth interior. I only did this on the inside of the 1/2" copper pipe where the wort would be flowing through. It is optional, but a good idea to prevent potential trub buildup inside the pipe. You can do the same thing with a dremel tool or a step bit. Once that was done I needed to prep the solder connections. To do this I needed to sand down every surface which needed to be soldered. This cleans the surface and allows for an good adhesion of the solder to the copper in the joints. I used 100 grit sandpaper and sanded the ends of each pipe and the insides of each fitting. There are tools commercially available to do this much easier and faster for about $10, but I didn't have one on hand and sandpaper works just fine. After all the solder points were prepped I could begin assembling. This step was supposed to be one of the easier steps of the process. I assumed that I would be assembling the unit by threading the 1/2" pipe all the way through the tee and the 3/4" pipe around it. This turned out to be one of the more difficult tasks of the build... As I mentioned, the tees have a lip inside which prevent the tubing from going further than the intended coupling which unfortunately is the exact thing we want them to do. To remedy this I tried a number of different tactics. I tried a swaging tool which I couldn't get to work with the fitting. I tried a tapered metal rod but of course I couldn't find one the correct diameter. I tried brute force which began to work but since I'd need to disassemble, add flux, then do it all over again I knew this was not an option... I settled on simply using a dremel tool with a sanding bit which was just a hair smaller than the inner diameter of the copper tee. By running the sander over the lip in the tee, I was able to grind it down enough to the point where the tube was finally able to thread completely through the tee. I have also been told that a drill press would work nicely for this as well if you have the correct size bit.Once you grind down the ridges in your tee fittings, do another dry fit to make sure the 1/2" pipes slide through all the fittings properly. Once you're sure everything fits together nicely you can disassemble it and prepare for soldering!
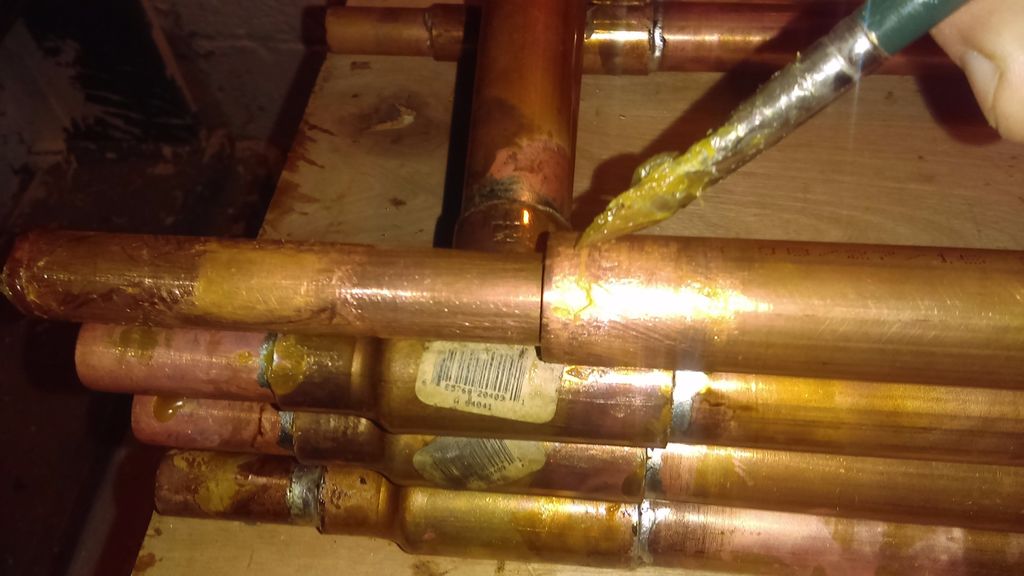
Soldering copper pipe was completely new to me. I had never done it before and I was a little nervous to try a new technique on my expensive pile of copper. Fortunately by taking my time, reading a few tutorials, and not getting too anxious I was able to solder the whole chiller in just a few hours. There are 16 fittings with 3 joints each which meant a total of 48 solder points. I learned a few things through all of this which helped me out quite a bit and I hope it will help you as well.I soldered the chiller as I would have assembled it, by starting with the bottom pipes and working my way up. Since The whole joint heats up when you are soldering a single connection, I fount it to be most economical to solder all 3 connections of each fitting at once. This meant adding flux to the inside of each fitting and each pipe end, then sliding the pipe into the tee. The 1/2" pipe should stick out 1.5 inches from the outside of the tee fitting, and the 3/4" pipe should fit snug until it hits the stop on the inside of each fitting. Once assembled, heat the joint with the blow torch using a decent sized flame. Trying to do it with a smaller flame takes forever and does not get the fitting hot enough to melt the solder. Once the fitting is nice and hot, test it by touching the solder to the connection point between the pipe and fitting. You're looking for the pipe to melt the solder, not the flame. If you put the solder directly into the flame this will just melt the solder and not let it enter the joint. If the joint is hot enough the solder will melt and capillary action assisted by the flux will draw the solder deep into the joint. I found it easiest to touch the solder to the top of the joint and let it flow down and get drawn into one side, then the other. Add solder until it begins to build up at the base of the joint. This means the joint is full of solder and you can move on. Double check all parts of the connection to ensure there is solder in the joint. Once you've completed the first two straight sections and the one connection pipe between the two, you'll be soldering a tee which is directly over the first one you did. As you heat the new fitting, you don't want your first fitting heating up and loosening, so I found it best to lay a damp cloth over the set joint and wedging a small piece of wood between the pipes to keep the tees apart just a little bit. Continue in this manner until all of your joints are soldered and your chiller is assembled!Once you're all done soldering then you're almost done. Clean off the extra flux with a damp cloth and some soapy water. Take your silicone tubing and cut it into 7x 10" sections. This will connect each straight section of 1/2" tube to the next. They will stay very firmly in place with nothing more than friction, so there is no need to further secure these. Last but not least, take your garden hose, chop off the two ends, put the hose clamp onto each section of hose end and work it onto the ends of the 90 degree elbows. You want the water inlet to be on the bottom and the outlet to be on the top. The hot wort will enter on top thorugh the tee with the water outlet and the wort will exit on the bottom with the water inlet tee. Once the hoses are on, secure them to the copper with the hose clamps.
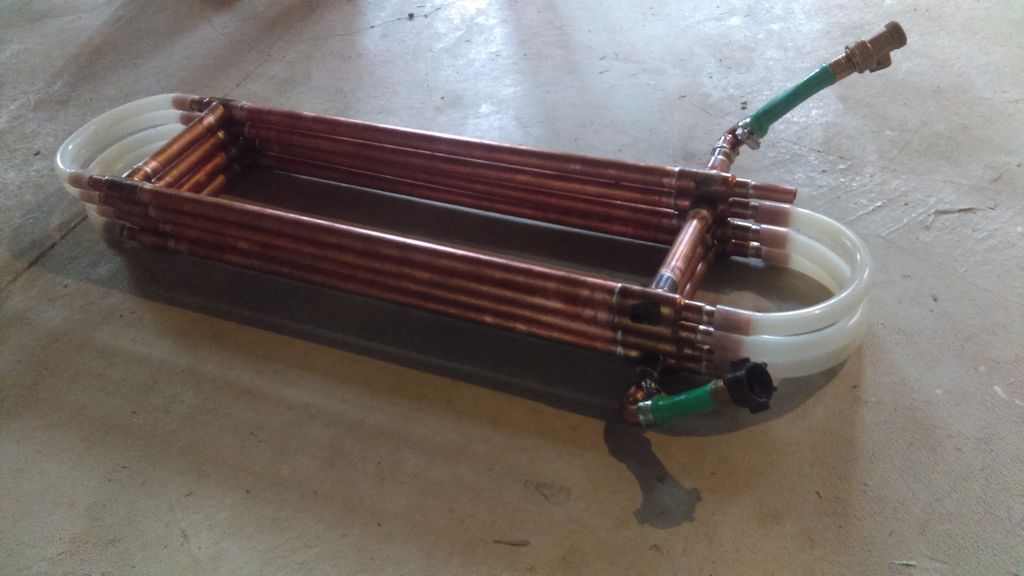
This is my finished product! I hooked it up to the sink with another section of hose and ran water through the chiller to test for leaks. I put it under pressure as well and didn't find a single drop of water from any of the joints. I put it to the test and by running my water at about 1/3 pressure I am able to bring a 5 gallon batch of boiling wort down to ale pitching temps in a single pass which took about 7 minutes with the pump throttled back a little bit. The wort inlet and outlet sections are hooked up with a different section of silicone hose and a camlock attachment at the opposite end which connect to the rest of my system at the pump and the recirculation arm in my boil kettle. If I could do it all over again I wouldn't change a thing, but there are some adjustments I plan to make in the future. The garden hose attachments aren't quite as "sexy" as the rest of the chiller, and I plan to add proper brass male and female GHT (garden hose thread) sections to the chiller at some point, but this is good enough for now. Additionally, I plan on weaving some copper wire back and forth between the pipes to shore it up and make sure it is nice and straight, but it is plenty strong enough as it is to stay together just by the solder connections alone. This has been my favorite homebrewing build yet and I hope it inspires you enough to make your own!
Question & Answer
Question: Select the incoherent image in the following sequence of images.
Choices:
 |
 |
 |
 |
|---|---|---|---|
| (A) | (B) | (C) | (D) |
|
|---|
 |