Question ID: 4000-9533-2-5-6-7
Recipe Description
As delicious as these pillowy treats are, they're fortunately quite simple to make. Here's what you need:Dry Ingredients4 1/2 Cups of Bread Flour (No all purpose or pastry flour here please)2/3 Cup of Baking Soda (Baking Powder is different stuff, save it for a cake)1 Tablespoon of Sugar2 Teaspoons of Salt1 packet of Yeast (1/4 oz by weight)Coarse SaltWet Ingredients10 Cups of Water (In a pot for a later step)1 Cup of Water3/4 Cup of Unsalted Butter (Melted)1 egg yolk (beaten with 3 tsp of water)Before we move on, a word about yeast. I'm using breadmachine yeast as you can see in the picture, but any active-dry yeast works. If you want to substitute for another type of yeast, just bloom it first in the 1 cup of water and half of the sugar and count it as a wet ingredient from here on out.
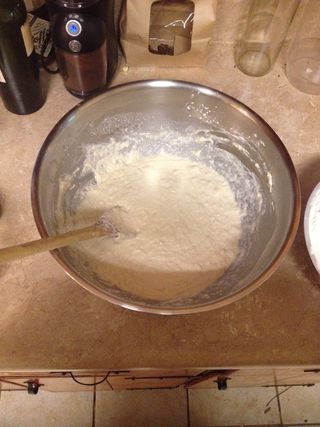
Just as Chefs prepare a mise en place for their restaurants, so should you prep everything when cooking. Beyond being good habit, it'll make all of the other steps a breeze. Enough lecturing, to prep!Wet IngredientsTake your 1 Cup of Water and your butter, pour them together and toss them in the microwave for a few bursts to get it to your target temperature of 130 F (54 C). No thermometer? No problem. Just heat the water up until it is uncomfortable to touch, but doesn't scald you and it'll be fine.Dry IngredientsStart off by sifting all of the dry ingredients (except the baking soda, trust me you don't want that in the dough) together through a fine mesh strainer into a small mixing bowl. Now in hindsight, the better way to do this would be to combine the dry ingredients now and sift them into the wet ingredients later but thanks to a handy trick we won't get lumps anyways so it's not a big deal.
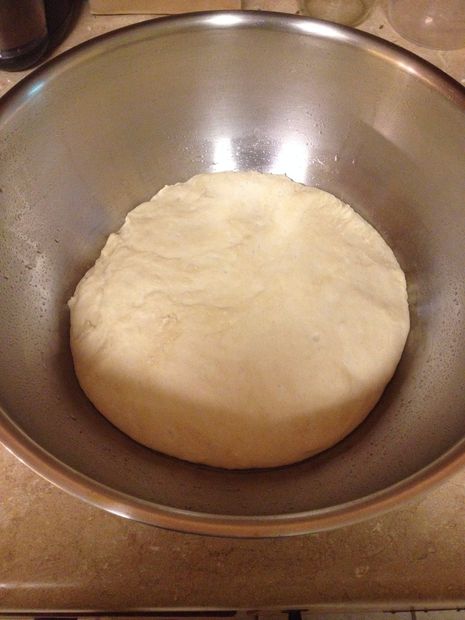
FirstPour your hot liquids into a large metal bowl (a stockpot actually works too, but is more annoying to clean) and don't worry about heat loss. The reason we do this is specifically to heat the bowl a bit so that when we introduce the yeast things stay warmer longer. Remember warm yeast is happy yeast. If you've got a nice mixer, do the same into your work bowl.SecondSlowly add about 1/3 of the dry to the wet with a wooden spoon or silicon spatula, starting with a goal of a pancake batter-like consistency. As we slowly add and mix in the flour we're going to be able fold out any lumps thanks to the weight of the dough. Plus, we hydrate the flour more evenly which means gluten (yes the scary stuff that you've heard about being unhealthy but actually isn't) proteins can form en masse giving the dough better structure and texture.For our mixer folks, do the same only with a paddle attachment until the dough starts sticking a bit, then switch to the hook.ThirdAdjustment is the name of this game. Depending on the humidity, the temperature, and the will of the gods dough will react differently. Just add little bits of whatever you need at a time until the dough stays together and forms a nice shiny skin. All mixing in this step should be done by hand because this transitions us very well into...FourthKnead like you mean it. Yes, you can do it in the bowl if it's big enough but if it's not just throw some flour down on a clean counter and go to town. You really want to develop those gluten chains now, so we have a perfectly inflated dough. We'll do a bit of kneading later, once the dough rises, but this is the main event for kneading. I know that you could continue with your dough hook at this point, but kneading is both good for the soul and your body so unless you've got a good reason I expect you to roll up those sleeves and get cracking.
We want that big bowl back so we have space for the dough to rise freely and there's no reason not to pop the dough into the bowl that held our dry ingredients for a second while we go ahead and wash up that big bowl. There's an added benefit here of warming the bowl up in hot water while we wash it, which will only help the dough to rise once we pop it back in.Now before we can get to the main event, we've got to oil up our newly washed big bowl with some vegetable oil (about a teaspoon by my count will be enough). Once you're done with that, pull the great switcheroo and pop that dough into the lubed up bowl. Throw a towel on top and we're ready to let that dough do its thing.
My handy and surprisingly culinary iphone companion helped me out here, but any timer you can hear will do just fine. Now the full hour isn't super necessary, but it's a good endtime to establish. Check back around 50 minutes and if the dough's doubled in size you're set to end a bit early.
Once you've revealed your dough to look lovely and doubled in size it is ready for shaping. Now go ahead and start preheating your oven at this time, because we still have a few steps to go.Before go forward though let's have a quick note about ovens and heat. Most ovens we use at home will have hot spots and whatnot. More importantly, unless we're fastidious about cleaning them they'll be a little uneven. This is fine but it means that our oven temperature is a bit fluid. For my oven 450 is the way to go, but I have to turn the pan midway through or I burn one side pretty badly. Your oven will be different, so the first time you make these be sure to check in a couple times during baking to see if any adjustments need to be made.
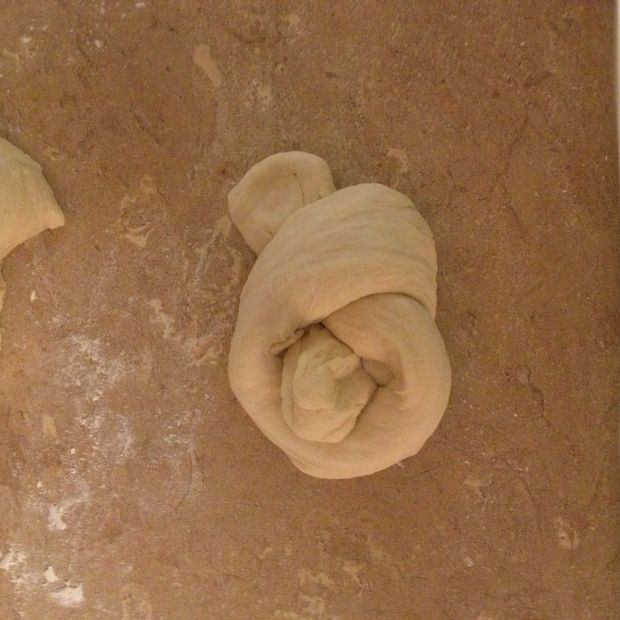
And here it is, the part that bothered me the most when I thought about making pretzels myself. Shaping has always been intimidating to me, but once you get the hang of things it's really quite simple. Start off by rolling the dough out into a log shape about 3 inches wide. It'll get long, so make sure you flour enough space. From here you chose how many pretzels you want to make. Personally I like to make 12 pretzels off of this recipe, but it's very customizable whether you want more or fewer. As for the shape itself, start with one piece of dough and roll it out into tube about 7-8 inches long. From there tie a simple overhand knot, but pulling the dough wide when threading the though the loop to prevent sticking. Once done, flip the knot over so both ends are resting on the counter a bit like a turtle. The first one will look awful, but don't worry because when the dough rises in the oven any crinkles or ugly bits will smooth out into a beautiful smooth twist.
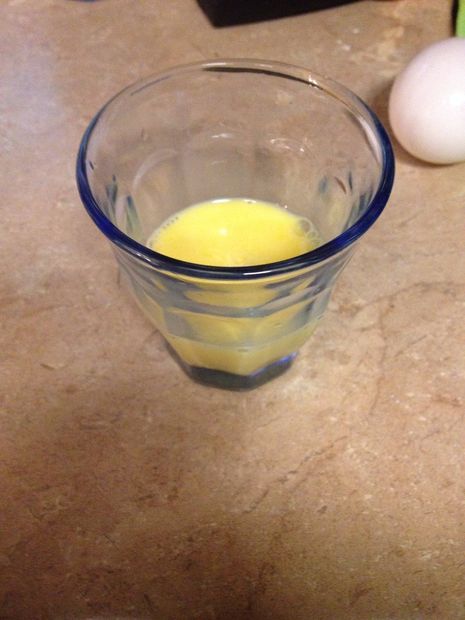
That baking soda and pot full of water are finally going fulfill their destiny by giving our pretzels their distinct tangy flavor with the distinctly unpleasant horror of dealing with the more traditional flavorant, lye. Start off by pouring the baking soda into the water and stirring a bit. You don't need it to dissolve all the way, so once it's mostly mixed turn up the heat to high. Once the water boils, turn it down to medium high and pop a few of those dough knots into the brew. You don't want to have them overcook so after 35 seconds pull them out onto some paper towels to dry. If you have a cooling rack, use that instead and save a few trees. I did this in two waves, so six twists took a bath and landed on a parchment paper lined sheet pan which then went into the oven. Be sure to leave lots of space between the twists because they'll grow quite a bit while in the oven. Be sure to brush them down with our egg mixture before the twists hit the heat to give them that delightfully shiny look we know and love. Additionally, that egg wash will hold the coarse salt on tightly and prevent salt loss later down the road.Bake time will vary depending on your oven, but the magic time I've come to is 12 1/2 minutes. Be sure to check the bottoms of the twists as they might burn even if the tops look fine.
Congratulations, we've reached the end. The pretzels are done and we have the opportunity to eat them with some other stuff. Personally, I'm partial to a Rachel Ray recipe for german beer cheese to go along with these tasty treats, but some good old fashioned mustard works just fine too.On top of dips and whatnot, you can also treat these just like bagels and add different toppings or mix different things into the dough. Jalapenos or other hot peppers are a favorite of mine, but Nutella works surprisingly well too. I hope you enjoyed this instructable, and I can't wait to see your versions of my favorite snack!
Question & Answer
Question: What is the correct order of the images?
Choices:
    |
| (A) |
|
|
| (B) |
|
|
| (C) |
|
|
| (D) |
|
|
|---|
 (D) (D) |