Question ID: 3000-141-0-1-2-4
Recipe Description
When I made the candies in the picture, I experimented with many, many different techniques and recipes to figure out how to get the best flavor, texture and clarity.
I made them in small batches so I could do many experiments.
The recipe is for a small batch (one full mold for me). You will probably want to double, triple, or quadruple it.Recipe:
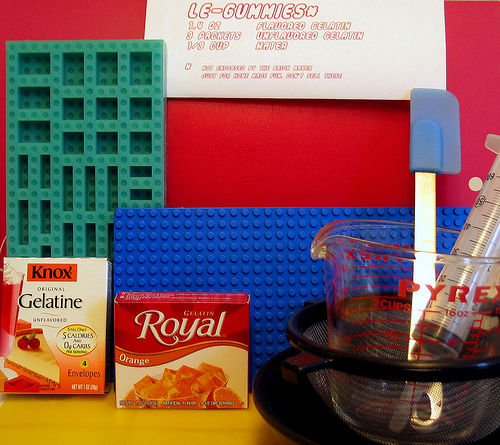
1 package of flavored Gelatin (Jello)
3 packets of Unflavored Gelatin (Knox is most common in the US - they come 4 packets to a box)
1 500 mg Vitamin C (optional but it adds some great sour flavor)
1/3 to 1/2 cup of waterTools:
Pyrex Measuring cup
A cooking pot that the cup will fit into
Some kind of spatula.
Mold or a flat bottom pan to pour the candy into
Mortar and Pestle (or a hammer?) to grind up the Vitamin C
In the photos you see me using a shallow pan with just about an 1" - 1 1/2" of water to melt the syrup. You should go ahead and use a pot with higher sides, so you can get the water level up another inch or two.
I used the shallow pan so it would be easier to see what was happening in the photos. I use a sauce pan when I make them now. A double boiler would be ideal, but I couldn't find one in the stores I visited. They aren't as popular as they used to be.
The syringe I used to fill the mold in the photos is optional. You can just pour the candy in. I bought the syringe at Tap Plastics. You can get big syringes like this in cooking stores also. There are syringes for injecting stuff into meats. They can handle the hot syrup really well but have a very small hole at the tip.
I have a metal and plastic trigger activated frosting gun. It is used to decorate cakes. I don't remember when, or where I bought it. I tend to buy tools when they are on sale, and think up a use later. I decided to try it out with the gummy syrup and it worked great. That is what I use now.
(The wire strainer in the photos is not needed. I reviewed my notes on the experiments and the clearest candies - the green and red, didn't use the strainer.)
To make gummies the only essential ingredient is unflavored gelatin.
For flavor I used flavored gelatin (Jello is one brand) plus a Vitamin C to bump up the pucker power.
I expect they can be made by adding candy flavorings and sweetener to unflavored gelatin, but I haven't tried it.
See step 3 if you want to make Sour Gummies.
The amount of flavored gelatin you use is up to you. I'm recommending a full package of flavored gelatin for each batch. It gives the candy a pretty intense flavor.
Use an extra packet of unflavored gelatin, and they will be even chewier. Use one less, and they will be softer.HERE WE GO:
'You might look at all the writing below and think that this is way too much work. All you are going to be doing though, is mixing the powder in water, melting it and pouring it into molds. I've just written a ton, so you know a lot of the pitfalls and know exactly how I make them.'
If you don't really care how clear the candy is, just stir the powders in the water, put it in hot water on the stove and melt it, then pour it in the molds.
If you want them really clear then read the details below.
I use a little over 1/3 cup of water (you can use even more for softer candies).
Measure 1/3 - 1/2 cup of cold water into your measuring cup.MIX IT UPSPRINKLE the gelatin powders into the water, as you continuously and gently stir it. Don't let the dry powder pile up. Sprinkle, stir, sprinkle, stir,... If you get a pile of gelatin and stir that in, it will make a lump, and lumps are hard to dissolve once you've made one. Do this rather quickly. The gelatin will immediately start absorbing the water. If you move too slowly it will get pretty dry towards the end and it will be very difficult to avoid lumps.
It will get very thick as you work in the powders. Sometimes it ended up like a lump of clay. Add just a tiny bit more water to the mix to get a slushy consistency. Either way will work fine. Scrape down the sides of your measuring cup and try to get all the gelatin down in contact with the wet stuff.LET IT REST
Cover the pyrex cup with plastic wrap and let it rest for 10 minutes. The gelatin needs time to absorb the water before we heat it.
You can leave the spatula in the gelatin while it is resting, but don't leave any chunks of gelatin on the back of the spatula where it will dry.I'M MELTING...
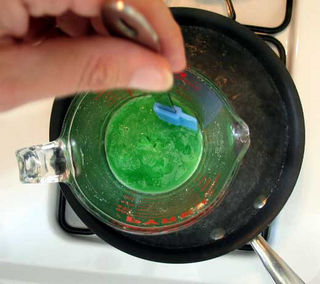
Put a pan of water on the stove and bring it up to a slow boil/fast simmer.
In the photos I'm using a shallow pan. I only did that so I could photograph the sides of the cup and let you see what was happening. I use a deeper sauce pan when I make them now.
After the resting time, remove the plastic wrap and put the measuring cup in the water. The lump of clay or slushy material will melt but it does take several minutes. Occasionally stir it. Stir it gently. Don't get too vigorous and mix a lot of air in it, or you will have cloudy candy. (If you are adding vitamin C to sour them up, add it at the very end.)
Once it melts, you will see that it has a layer of foam on top. Try to avoid mixing that foam back into the melted syrup. When it is hot enough you will see there is a very thin layer of clear on the bottom, a layer that isn't as clear, then the layer of foam on top.
Now stop stirring and just let it sit in the water for about 2 minutes. We are letting bubbles rise at this point.
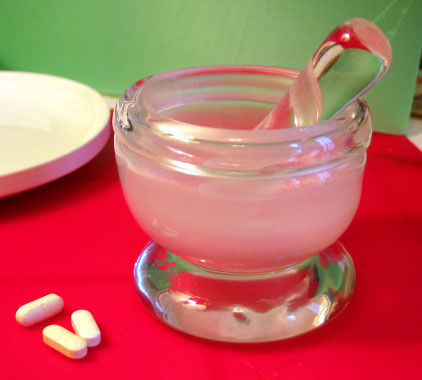
* For very clear candies: After melting the candy, put the pyrex cup in the fridge. Let it firm up. Then remove it from the cup and using a pair of scissors, cut it into chunks. Then using a knife or your scissors, carefully trim the foamy layer off. Remelt the clear chunks and you will end up with very clear syrup. Details of this process are in Step 5.FINALLY WE FILL THE MOLD
Now I put my syringe into the bottom of the cup and suck up all that clear syrup.
I use the syringe to squirt the candy into my mold.
(Step 4 has other ways of molding the candy).
If your mold won't hold all the syrup you made, turn the heat off and let the cup sit in the water while your first batch of candy is setting up. When you pull the first batch out of the mold, just turn on the stove and melt the syrup that is still in the cup the same way we did it the first time.
You don't need to use any kind of release (no oil or cooking sprays) with gummies. They will peel off of anything that is smooth. If you get some on your stove, floor, or counter, don't bother to try to clean it up while it is wet and hot. It's much easier to just let it set up and peel it off.
Most of the time when you make gummies you will not try to mold them in 360 degrees. The top side (which will be the bottom of the candies) is just left flat. I wanted to mold in little holes on the bottom of in my bricks so I could actually stack them.
The syrup contracts quite a lot as it cools. I had to fill the mold, then go back through and top them all off again as it would shrink way down. When I got them all full, I took the base plate (the same one I used when making the mold) and pressed it on the top of the mold, squeezing any extra goo out of the sides. Then I let it sit on the counter top for a couple of minutes. I do that, just so the stuff that leaked out the sides would set up and it wouldn't get all over my freezer when I put the mold in there.
I put the mold with the lid (base plate) into the freezer. You only leave it in the freezer for 10 or 15 minutes. If you are going to leave it longer, or you think you might forget it, you can just stick it in the fridge. It will be fine there without any worries about leaving it too long.
These candies actually do not need to be refrigerated at all to set up. You can just leave your mold on the counter at room temperature and they will still set up. I use the freezer to get them done faster.
Once they are set up, take them out of the mold. Clean them up if they need it, and you are done.
Sour Gummies
I really like sour flavors in gummy candies.
The official way to make sour gummies is to add Ascorbic Acid Powder. Other powders that will add sour are called Citric Acid or Vitamin C powder. You can buy it in a cooking store, a health food store that sells supplements, probably some pharmacies and I think it's even available at some bulk food stores.
Sometimes it is incredibly expensive, especially if it is from some "Life Extension" or "Body Cleansing" type of vitamin company.
I've never bothered with buying the powder. Ascorbic acid is Vitamin C. I just grind up a Vitamin C tablet with my mortar and pestle. The cheaper the vitamin C the better the flavor I think. Rose hips Vitamin C is not as sour, and has some kind of non sour flavor. I'm not really sure how to describe it.
I'm not sure what the chewables, or timed released Vitamin C's would do, or how they would taste. The added ingredients in those vitamins might not like being heated, and they might cloud up your candies. Just stick to plain cheap generic Vitamin C if you are going to grind your own. For pure sour pucker power, the cheaper the better.I add the powder of one 500mg Vitamin C to a batch of gummies. That will change the flavor so it doesn't taste so much like a Jello Flavor. I LOVE 3 Vitamin C's - that's a great candy flavor to me. It's one of those things you just have to do by taste. You might like more, or less, than I do.
The easiest way to sour up gummies, and to also give them more concentrated flavor is to add unsweetened Kool-Aid powder! There are a lot of flavor experiments you can try by mixing different flavored gelatin with different flavors of Kool-Aid. They don't come out very clear though.
There are all the other kind of powdered drink mixes. I don't know how they would react if you stirred them into the hot gummy syrup, but I'm sure they would be fine if you rolled the candies in them when you were finished. A good lemonade powder mix would probably taste pretty good.After it is melted and almost ready to go into the mold, stir in the Vitamin C, then let the syrup sit in the bath for a couple of minutes.
This info applies to candy making in general: When making candy, you will almost always add the flavorings right at the end. The reason is, sometimes flavorings can change flavor or breakdown completely when they are heated. When you are making candy, you will usually cook your candy first, then stir in flavorings right after you take it off the stove.
Have fun and experiment.
You don't need to make a custom mold like I did to make gummy candies. There are many great silicone molds available. They are used for making candies, baking, molding butter, making ice,...
It doesn't have to be made of silicone either. A regular Ice tray will work too. Any thing that has a flat and smooth surface should work fine. I read a suggestion, by a Mom on some recipe site, to pull the rack out of your toaster oven, put a piece of foil on it, and push the foil down through the slats. She made a gummy worm mold that way.
This stuff is very forgiving.Mold Options
Pour the candy in a flat pan and after it has gelled, then just slice it into squares, rectangles and triangles with a knife. You could cut shapes out with cookie cutters. You could even peel the sheet off in one piece, and cut it up with scissors.
Whatever you do, I'd recommend you keep them pretty small. If you are using an ice tray, or a butter mold, or any mold with large compartments, don't fill it to the top. Just fill them up to around 1/4 or 1/2 an inch.
You can make Mega-Gummies if you really want to. Ever wanted a gummy the size of an Ice Cube? Go ahead. It will work fine. Want one shaped like a Banana? Go ahead - just don't tell me what you plan on doing with it.HOW I MADE THE SILICONE MOLD
I purchased Food Grade Silicone fromDouglas & Sturgess. They are a Sculpture Tools, Materials and Supplies store in San Francisco. They are really great folks and have some incredible casting materials that you can't find anywhere else. I bet you MythBusters buys their Ballistics Gel there. Well, I guess I shouldn't bet. Where they bought it is probably on the web, and I've already spent enough money on this project.
The number I used is FGS-2237 Food Grade Silicone. (There is a new number MC-1287) Here is a link
You need two parts. Part A is the silicone gel and part B is the catalyst. They sell it as a set. This is a 1 lb. set.
The silicone must be weighed to make sure you put in the right amount of catalyst. It's 10 parts Silicone (part A) to 1 part Catalyst (part B). Buy yourself a gram scale to do this. You really want to be accurate. You don't want to waste this stuff because you measured wrong.
I made my positive (the part that I made the mold from) out of - you guessed it - Legos!
When I was a kid, way back in the last Century, Legos were still this strange toy from Scandinavia. That was where all the "adult" films and Anita Eckberg came from - she was our Paris Hilton. She was beautiful, classy, spoke with a sultry Swedish accent, and went to the best parties. Well I guess she wasn't very Paris Hiltonish at all.
The only kids who had Legos were the ones who had Moms, or Grandparents, from Europe, or a Dad that we never saw, because he was always "away on business". Those kids got cool gifts. You could tell some of them came from the Airport gift store though.
I had an Erector set and was very happy with it.Woops Sorry I got sidetracked -HOW TO MAKE THE MOLD
As I was saying, I never had Legos and I still didn't have any when I decided to make this project. I visited the Lego website and found a set that I really wanted that had enough pieces for my mold and bought that. I planned what I needed with the Lego Digital Designer. It's a free software program you can download from Lego and it lets you build Lego stuff in VR. It will even count up the pieces for you and place an order.
I wanted my tray to not waste any space. If I left more than a single peg between each candy piece I'd be wasting the silicone.
When I got the Legos - I built the Taj Mahal - I couldn't resist! Have you seen it? It's amazing. 5,922 pieces.
So three days later, after I finished the Taj, I started taking it apart to get my candy mold pieces.
I put the pieces on a tray, and ringed the tray edge with a double stack of pieces to act as a wall and hold the silicone in (there is a photo of it below). Legos are made so well, that they really fit tightly together. I found that I didn't have to seal any of the cracks between the pieces inside.
Silicone will not stick to Legos. So you don't need to put any kind of mold release on the positive.
Just stick the pieces in there and make sure you stick them down really good.Weigh the Silicone
To measure how much silicone you are going to need to fill the mold, you can measure it a couple of ways. The standard way is to fill the positive with water, pour the water into the plastic cup you are going to mix it in, and just draw a line on the cup at the water line. That is how much silicone you will need to fill the mold.
You can't let any water get anywhere near your silicone before you cast it though. If you measure your mold with water, make sure you allow plenty of time for it to get bone dry before you try to make your mold.
To avoid the water problem I used Lentils - yeah like in the soup - but dry ones. They have some really small black ones at the bulk food store and they don't put out any dust, so they are great for this. Just pour the lentils over your positive, then pour them into your mixing container. They don't mess your positive up at all. Then you don't have to worry about liquid spoiling your mold.
Put your plastic container - with the line marked on it, on your gram scale and set the scale to zero. That way you won't be weighing your plastic cup, just the silicone. Now pour enough of Part A to get up to your marked line. Don't just glop it in there, try to avoid causing any air pockets. Check to see how much the silicone weighs. Let's say it measured 350g. Because you use 10 parts A and 1 part B, you will need 10% of that weight in Catalyst or 35g. Zero (sometimes the button you use to do this is labeled "Tare") your scale out, with the silicone still on it. Then add the 35g of Part B right into the same container.Mix it up
Mix your Part A and your Part B with something plastic. The catalyst is blue and the silicone is white so you can tell if you have it mixed. Scrape the sides and bottom as you do it. You want to be careful not to mix any extra air into it. Does that sound familiar? Just like the Gummies!
If you really want to make a perfect mold then you have to "de-air" the silicone. As this involves putting it in a vacuum chamber and most of us don't have one, you can just skip that step. There are lots of tips on the web on how to get the least bubbly silicone castings.Pour it in your tray
You will pour the mixed silicone over the positive. Fill the tray up until you cover the tops of the pieces.
Pour slowly and don't move the Silicone back and forth like you are drizzling on frosting. That will leave air bubbles in the corners around your pieces. Pour it in a stream that hits the bottom of the tray - not over the Lego pieces, and let it flow around the tray and fill it up. This will help you avoid trapping any air.
Silicone is pretty good about releasing bubbles so you probably will get a pretty good mold.
I'd tap the tray a few times, and I've even held a back massager against it to help it release any air. You need to be very careful, that any of this tapping, or vibrating doesn't loosen any of the pieces inside the mold. I did a test piece and when I was tapping it, one of them floated to the top! I just grabbed my plastic spoon and pushed it back down. The only problem it caused was I wasted silicone, because the inside filled up. Avoid that by making sure your pieces are stuck down really well before you pour in the Silicone.Let it set up
Don't try to clean up the cup and tools right now. Let them sit overnight. Most of it will set up and you can just peel it off. If you find you have any sticky spots of silicone gel, you can clean those off by dabbing them with a little Catalyst. That will make them set up and you should be able to peel it off.
Let the silicone set at least overnight, then just pull the Legos out of it. They will come out very easily. Let it set up for 24 hours before you use it. I put mine in the oven at 175 degrees for about 15 minutes after it had already been curing for 24 hours, just to make sure. It might not have been the right thing to do (I should have asked Douglas and Sturgess) but I knew they did that with some of the other silicones.
After you get the Legos out, just trim off any of the little bits that squeezed between the pieces. Wash the mold and you are ready to go.
Now if you will excuse me, I have to go rebuild the Taj Mahal.
ADDENDUM: How to get very clear candies
I figured out how to get really clear candies with almost no bubbles.
I started by straining my vitamin C through a paper coffee filter so I got most of the solids out. I ended up with a very sour liquid that looked like water.
The secret to clear candies is to melt it twice.
After the first cycle of heating, let it rest, and cool off in the refrigerator. Almost all of the bubbles will rise to the surface while it is cooling. When it is cool enough to handle, take it out of the cup (the foam layer sticks to the cup, just cut through it around the edge of the cup with a knife). Put some water in the cup to get that foam to soften up so you can clean it out before you heat the candy again.
Now take your lump of clear candy with the foam layer and cut the foam layer off. I found a clean pair of kitchen scissors works well. I call them "kitchen scissors" because I only use them with food and they stay in the kitchen. You can use any kind of scissors. I cut the big piece into chunks, then I trim the foam layer off.
I've also done this with a knife but you have to be really careful. I don't worry about getting it perfect. The bit of clear that remains on the foam can be melted down at the end to make some candies for the cook to eat after the main batch. When you melt the foamy chunks, you will probably find the clear part melts into a very clear layer. You can siphon that out with your syringe if you want. I just pour it in to about spoon sized circles on a silicone baking mat. Then I peel those dots up when they solidify and put them in a baggy for me to eat. They taste just as good.
Melt all of those clear chunks. No real need to stir it while it is melting. I leave it alone so I don't add any bubbles. I just give it a gentle stir at the end before I suck it up into the syringe.
This technique makes amazingly clear candies. I have two pyrex cups so I make a second batch while the first one is cooling, then while No. 2 cools, I cut the foam layer off No.1 and melt it for casting.
Question & Answer
Question: Select the incoherent image in the following sequence of images.
Choices:
 |
 |
 |
 |
|---|---|---|---|
| (A) | (B) | (C) | (D) |
|
|---|
 |