Question ID: 4000-3182-0-1-2-4
Recipe Description
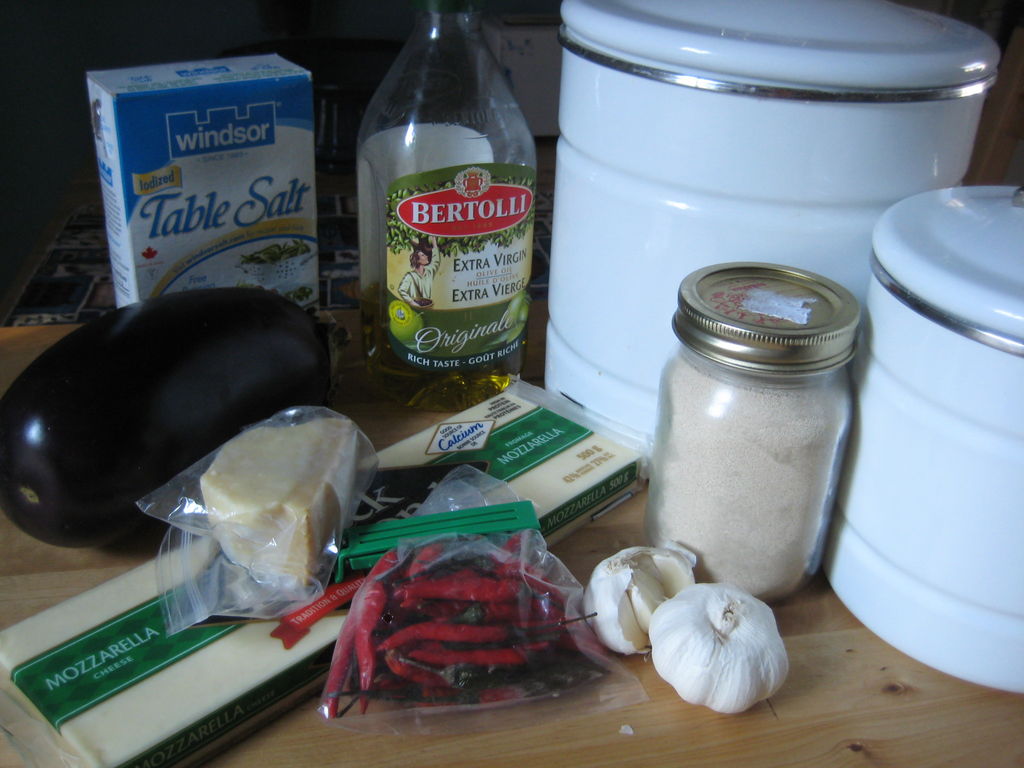
For the pizza dough:
- 1 1/2 c. hot water (as hot as you can run it from the tap, NOT BOILING or you will kill the yeast)
- 1 1/2 tsp. dry active yeast
- 1 tbsp. olive oil
- 1 tbsp. salt
- 1 tbsp. sugar
- 3 c. all-purpose flour
- oil for greasing the bowl
For the eggplant topping:
- 1 large eggplant
- olive oil for brushing
- 3/4 c. grated mozzarella
- 1/4 c. grated parmesan
- 2 tbsp. olive oil
- 2 tbsp. minced garlic
- 2 fresh chilies, minced (I use red thai chilies - if you prefer less heat, use less intense chilies like jalapeno)
(IMPORTANT NOTE: this dough recipe is good for TWO pizzas, so if you want two eggplant pizzas, just double the amount of eggplant topping ingredients, OR you could top that second pizza margherita-style by hopping over to my companion instructable, Homemade Pizza Margherita)
This dough recipe is one that I have had since I was in grade 8 Home Economics class, and it has never failed. It makes great pizzas every time, and can also be used for tasty calzones, or even an easy focaccia.
1. Sprinkle the yeast over the top of the hot water. Use the hottest water that you can run from your kitchen tap. DO NOT use boiling water or you will kill the yeast, and your dough will not rise. Let the yeast "bloom" for 5 minutes.
2. Add the olive oil, sugar and salt to the yeast, and stir.
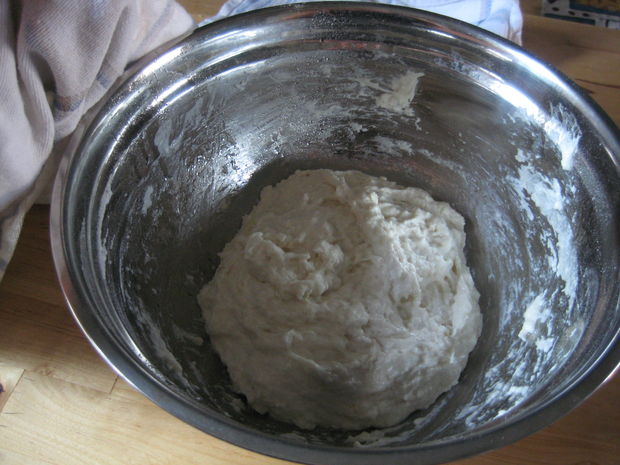
3. Measure the flour into a large bowl. Add the yeast mixture to the flour and, using a wooden spoon, stir until well combined. The dough will appear VERY gooey - this is normal, as it makes a much more tender dough. DO NOT add more flour to the dough during this step.
4. Brush or spray some oil over the sides of the bowl and the top of the dough. Flip the ball of dough over and oil the other side. This will help when removing the dough after rising.
5. Cover the bowl with a clean kitchen towel, and set in a warm location to rise for 1 hour. Looking for a warm location? Try above the fridge, above you cabinets, or on the stove as you're preheating the oven for the next step!
Onto the good stuff - this is where you can easily diverge from the recipe and top your pizza however you want, but I STRONGLY suggesting spicy eggplants. If, however, you choose to go your own way, skip ahead to the next step for directions for how to bake the pizza.
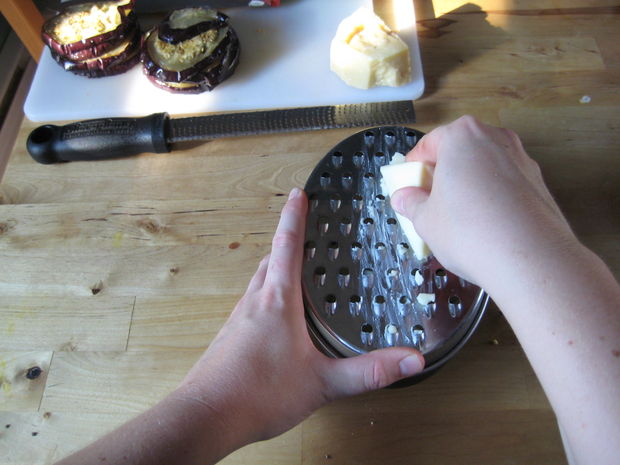
1. Slice up the eggplant into 1/3-inch slices and spread them onto an aluminum foil-lined baking pan brushed with oil. Brush the tops of the eggplant slices with oil also. Broil the eggplants until lightly browned, then turn them over and broil them the same way on the other side. Set them aside for now.
2. In a small frying pan, heat the 2 tbsp. of oil over medium high heat. Add the minced garlic and chilies, and swirl the pan for about a minute. You don't want to sauté them, just heat them and infuse the oil with all that garlicky-chili flavor. Remove the pan from the heat and set aside for now.
3. Mix the mozzarella and parmesan cheeses together in a bowl. Now you are ready to garnish your pizza!
1. Preheat the oven to 500 F. Set one rack in the lowest position in your oven. If you have a pizza stone, place it on the rack before you preheat, so that it can heat to the same temperature as the oven. If you don't have a pizza stone, you can just as easily bake the pizza on a baking sheet. A pizza stone is a good investment, however, as it makes for a nice crisp outside and tender inside to your pizza crust. I highly recommend it.
2. Generously flour a section of counter or a silpat* mat. This a really important step. The dough is very sticky, and this is when you will be adding in enough flour to make it workable, but not so much as to make it tough. So flour the counter well, and the rolling pin, and the top of the dough. Roll out half the pizza dough for one pizza, to 3/4-inch thick. You can make it round, or square, or free form in shape - I haven't found that either one tastes better than the other, but I've always like the rustic look of the free form pizza. (*A silpat mat in a silicone baking mat that can be laid over your counter before flouring. It will make transferring the dough to the pizza stone easier, and make cleaning up a cinch. If you don't have one, but ARE baking on a pizza stone, transfer your dough to a floured, reverse baking sheet, so you can then slide the dough onto the stone once it is topped.)
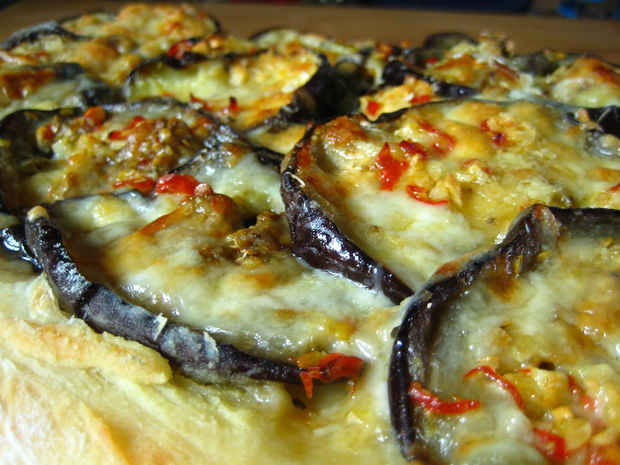
3. Now for the toppings: First sprinkle about 1/4 of the cheese mixture over the dough. This will help the rest of the toppings adhere to the crust once baked. Lay the eggplant slices over the crust, leaving a 3/4-inch edge for holding, and overlapping the slices where necessary. Top with the remaining cheese mixture. Finally, drizzle the garlic-chili oil, garlic and chili included, over the top of the cheese. Make sure to drizzle it lightly and evenly over the entire pizza, or you will end up with pockets of heat - unless, of course, that is what you are going for!
4. If you floured your surface really well, this part should will be easy. However, I have made this pizza half a dozen times, and this step has not gotten any easier. Using the help of a large spatula, slide the pizza off the counter and onto your baking sheet, or if you are using a stone, off the silpat or reversed baking sheet and onto the stone. Don't worry about squishing and smushing the pizza as you move it, you can adjust its size slightly once in the oven. Be careful not to burn yourself on the pizza stone - it is currently at 500 F! Close the oven and bake the pizza for 12-15 minutes, depending on how brown you like your crust, and how hot your oven runs. Remember - no two ovens are the same.
Oooh, this is the best part. Once that timer rings, remove the pizza from the oven, either on its baking sheet or using a pair of tongs to slide it off the stone and onto a cutting board. Turn off the oven.
Bask in the awesomeness of a spicy, garlicky, cheesy eggplant plant pizza, with its tender-crisp homemade crust - oh yum.
Grab your pizza wheel and slice into that bad boy - and enjoy.
Remember, there's still enough dough left for a second pizza, so you always recreate this one, or hop on over to my recipe for Homemade Pizza Margherita and try that one out too. The two topping combinations compliment each other nicely.
Question & Answer
Question: What is the correct order of the images?
Choices:
    |
| (A) |
|
|
| (B) |
|
|
| (C) |
|
|
| (D) |
|
|
|---|
 (B) (B) |